

For years, I avoided using drip irrigation because it seemed entirely too complicated and expensive. My garden suffered…and died, died, died. Year after year, I would attempt to go on vacation in July by trying different systems such as cotton wicks plunged into 5-gallon buckets of water or flooding plants before leaving by using all types of stakes that attached to 2-liter bottles. I finally caved and decided that I had to either try drip irrigation or stop buying plants altogether. Within minutes of receiving my first kit, I realized that I should have started much sooner. Drip irrigation is SO EASY and it saves oodles of time and aggravation! While there are some reasonable costs involved, there are also many savings. For starters, plants live instead of dying! That means fewer plants to purchase. Furthermore, less water is needed since hydration is provided directly to the roots without wetting the foliage.
Where to buy. One option is to start with a kit like the Raindrip Automatic Container and Hanging Baskets Kit which has much of what you need to see if drip irritation is something you would like to use.
If you don’t want a kit or you are already pretty committed to an expansive drip irrigation system, here are the supplies that I use. I have also seen drip irrigation supplies at local retailers such as Orscheln’s, Menard’s, Home Depot, and Lowe’s.
- Orbit Programmable Timer
- backflow preventer or vacuum breaker
- inline filter
- 25 psi pressure regulator
- barbed adapter
- 1/4″ tubing
- tees
- coupling
- goof plugs
Keep in mind, that unless you want to create a large-scale system, it might save money to buy some of these in groupings. For instance this 1/4″ barbed assortment includes tees, couplings, and goof plugs in a smaller quantity and at at a good price.
Specifications. If your hose has a low flow rate, be sure to attend to this before moving forward. When I started, I initially bought a kit with similar fittings described in this post. It promised to water 60 emitters at a max flow rate of only 30 gallons per hour. If your spigot would fill a five-gallon bucket at least six times in an hour, you should be in good shape. If you want more than 60 emitters on your line, you could set up two different lines. The Orbit would allow you to water each line at a different time. It should also be noted that, to have adequate water pressure, you cannot have a continuous line of tubing longer than 50 feet. Finally, some larger pots might require 2 or more emitters.
Connect to the faucet spigot. You will start by hooking up the following items to the faucet spigot in this order:
- backflow preventer
- inline filter
- pressure regulator
- barbed adapter
 Barbed adapter connects to the tubing which carries the water out to your plants.
Add an emitter to each container. You then just cut a piece of that tubing near each plant, insert a Tee, and then attach another piece of tubing which is connected to an emitter that drips into your pot. SO EASY!

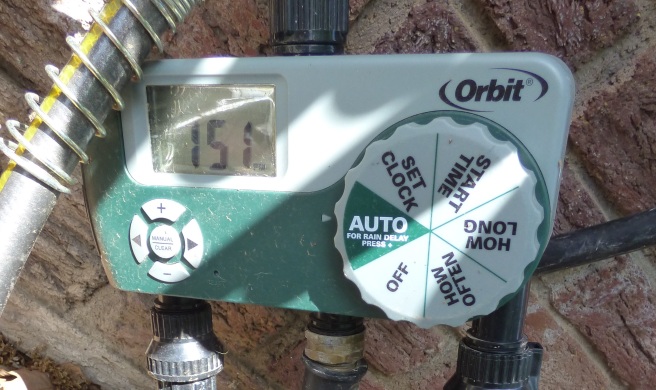
Which timer should you buy? Some kits include a timer, but after trying several different timers, I have found the Orbit Programmable Timers to be the most reliable and easiest to use. You can buy them with one, two, or three outlets. I started with the single-outlet timer which watered a lot of containers, but I eventually expanded so much that I needed two outlets to accommodate two different watering zones. More recently, I added a third outlet to accommodate a few containers that require very little water. With that said, I think it likely that a single outlet would meet the needs of most gardeners.
Setting the Timer. You will turn the dial counterclockwise to set the current time, a start time, duration, and frequency for each outlet. The plus and minus buttons are used to make these desired adjustments. If you buy a two- or three-outlet timer, the arrows are used to choose which outlet you are programming. All timers also have a manual option that can be used to turn on the water without waiting for the desired time.
How much water? Depending on the outdoor temperature, I set the timer to water 1-2 times per day for 10-20 minutes per cycle. If we receive a fair bit of rain, I simply push the rain-delay button on the timer and watering is delayed for 24 hours.
Fall Maintenance. Every fall, I cut off the tubing from the barbed adapter and bring everything that connects the spigot to the tubing inside, all in one piece. This includes the timer.
Spring Maintenance. In the spring, I insert fresh batteries into the timer and then switch out the old washer for a new one before hooking the timer to the spigot. You may also need a new barbed adapter to attach the tubing. Then, I turn everything on and walk the lines to make sure each emitter is still working. Invariably, a few emitters will need replacing or a tube needs reattaching.
Using drip irrigation has increased my gardening success and enjoyment immeasurably. To read about some fun and creative ways to use drip irrigation, please see 6 Creative Uses for Drip Irrigation.
Happy Gardening!

One thought on “The Beginner’s Guide to Using Drip Irrigation in your Container Garden. It’s EASY!”