If you want the most beautiful cookies with a clean edge and smooth surface, you need to be looking into Royal icing. But for flavor, nothing beats buttercream. Unfortunately, that can be a challenge when you want cookies both beautiful and delicious AND you only make sugar cookies once a year, so you don’t get a lot of practice making and using icing.
It is best to use an icing recipe that will crust a bit on the surface so that your cookies can be stacked, but the icing should still be relatively soft to have a pleasant texture. If you need such a recipe, please see my recipe for buttercream cookie icing.
Next, please see the following images for Christmas cookies decorated with buttercream. Many also have decorations found on Amazon and Etsy.
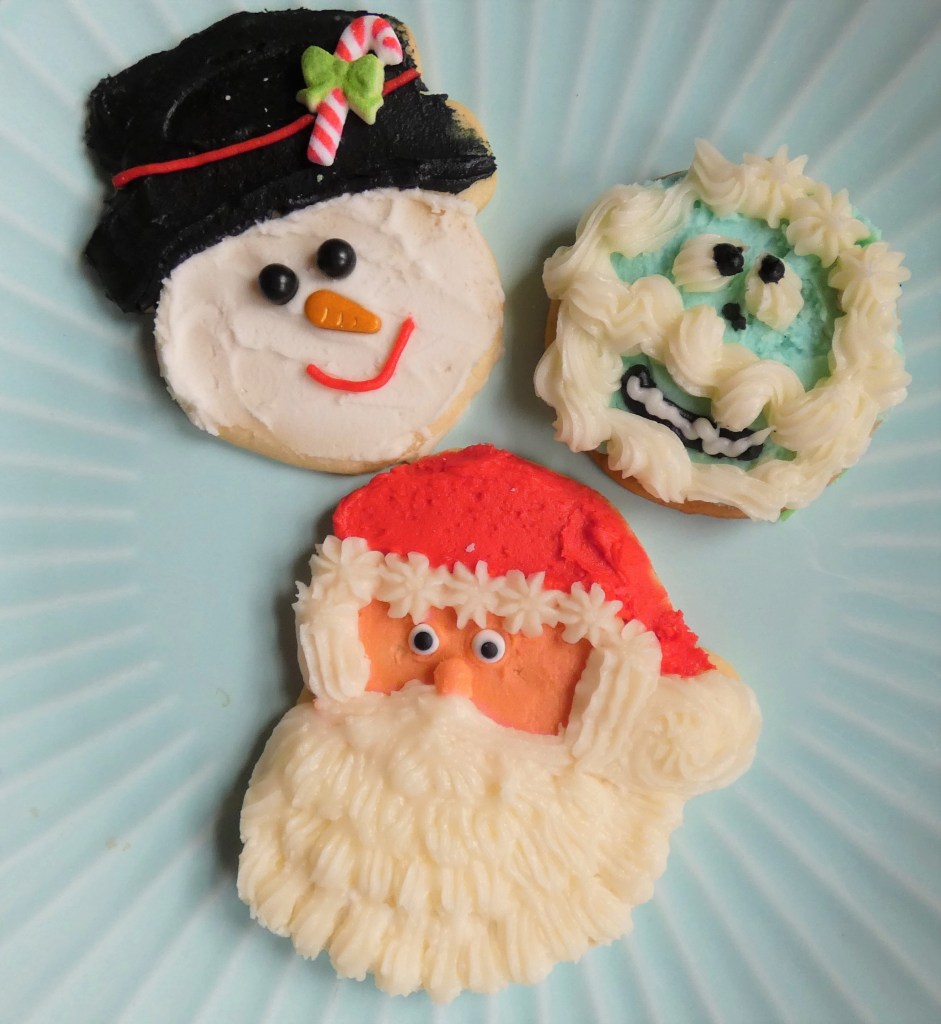
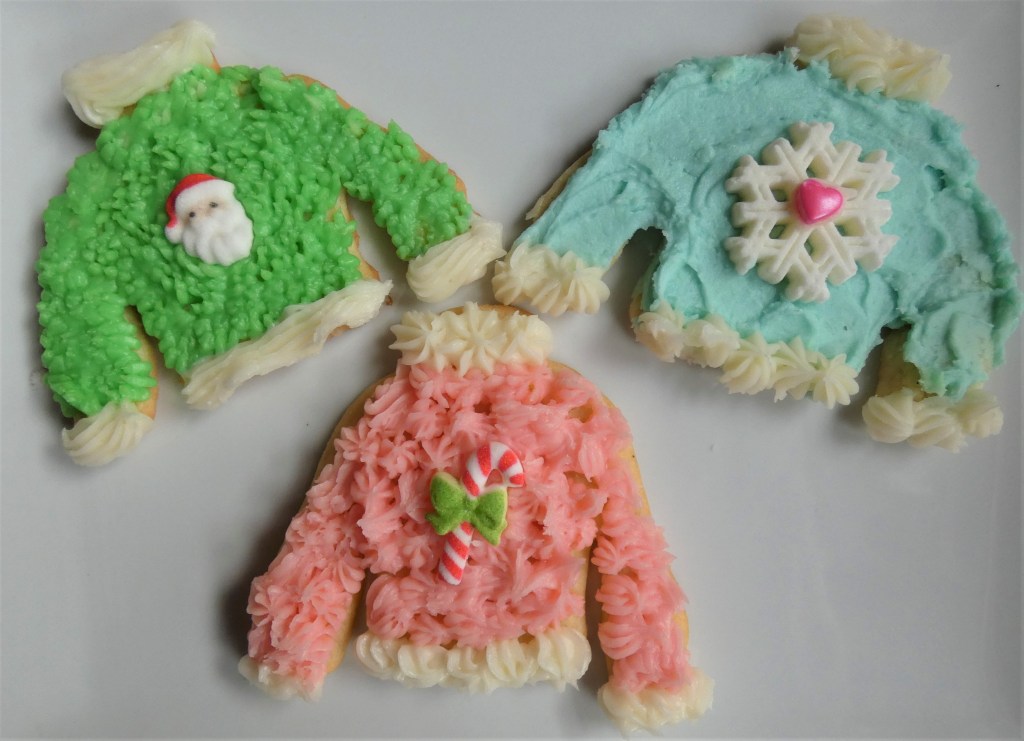
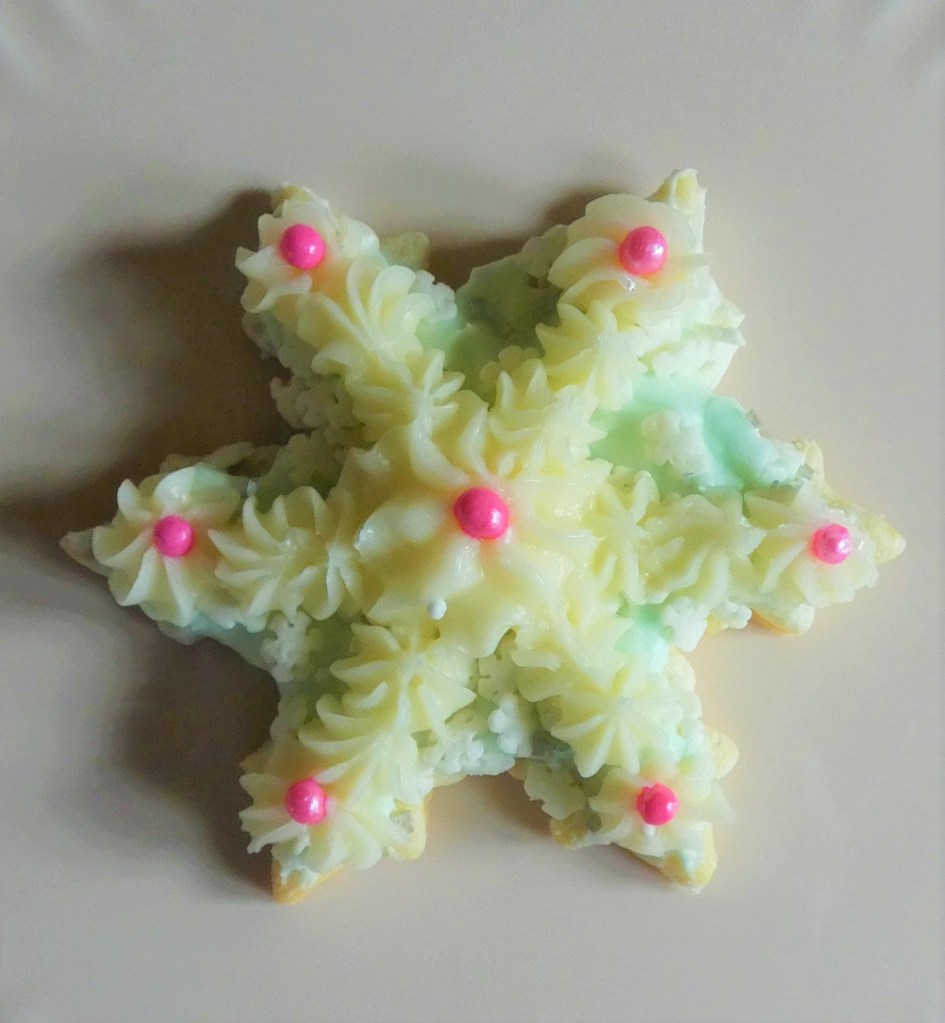
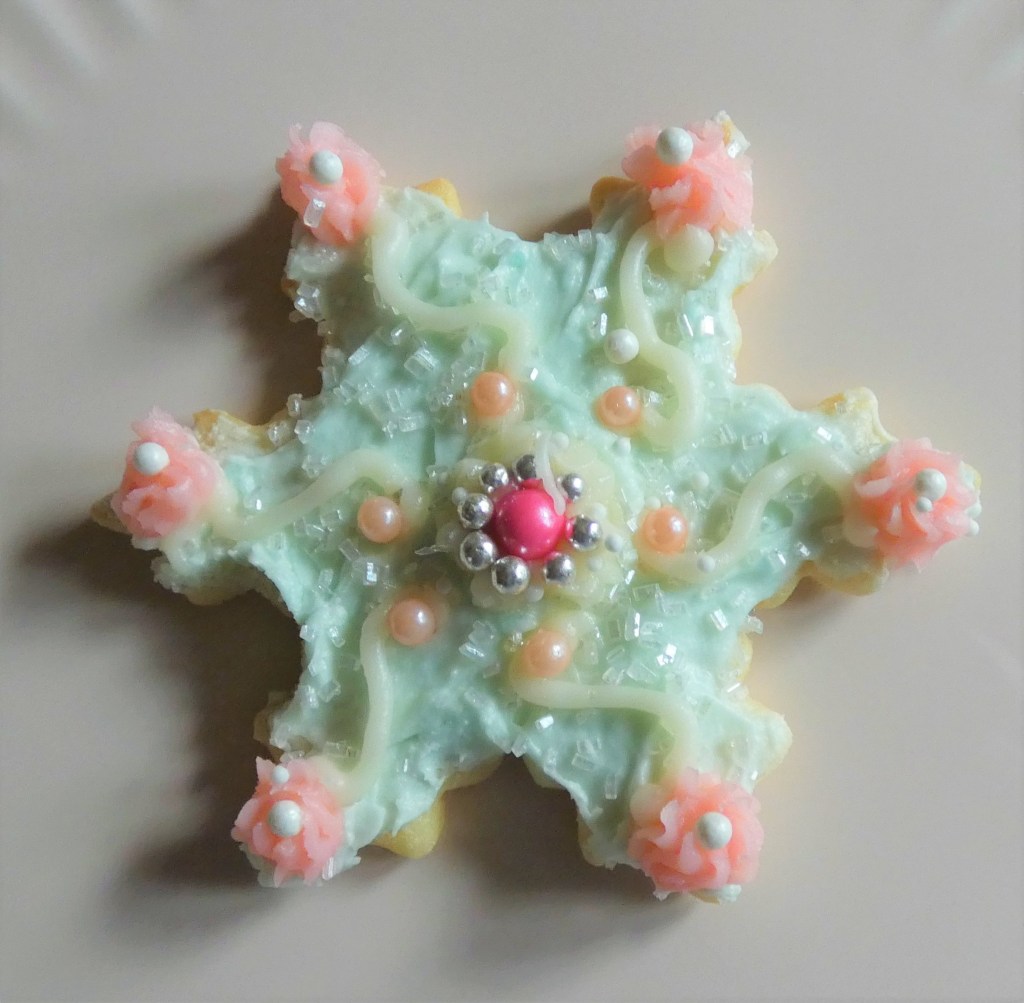
Frosty, Abominable Snowman, Santa For Frosty, carefully spread the white frosting on before the black. Be careful that the black and write frosting do not touch. Frosty is a nice design if you do not having any piping tools as you can place some red frosting in a sandwich bag and cut a little off the corner to pipe. Sweaters primarily used star tips, but the green one used a grass tip. This tip has proved versatile when creating wreaths, trees, window boxes, and sweaters. Snowglobes. The main thing I would do differently with these snowglobes would be not trying to pipe around the edges as this made them look much messier. Snowglobes are definitely an area where I have a lot of room to improve!OrnamentsSnowflakes. For these snowflakes, cookies were dipped in thinned icing or icing was carefully spread thinly on top. Sparkling sugar or sprinkles that looked like snow or snowflakes were then sprinkled on top. Next, icing was piped on with a star or plain tip. Finally, silver dragees or sugar pearls were placed on with tweezers.
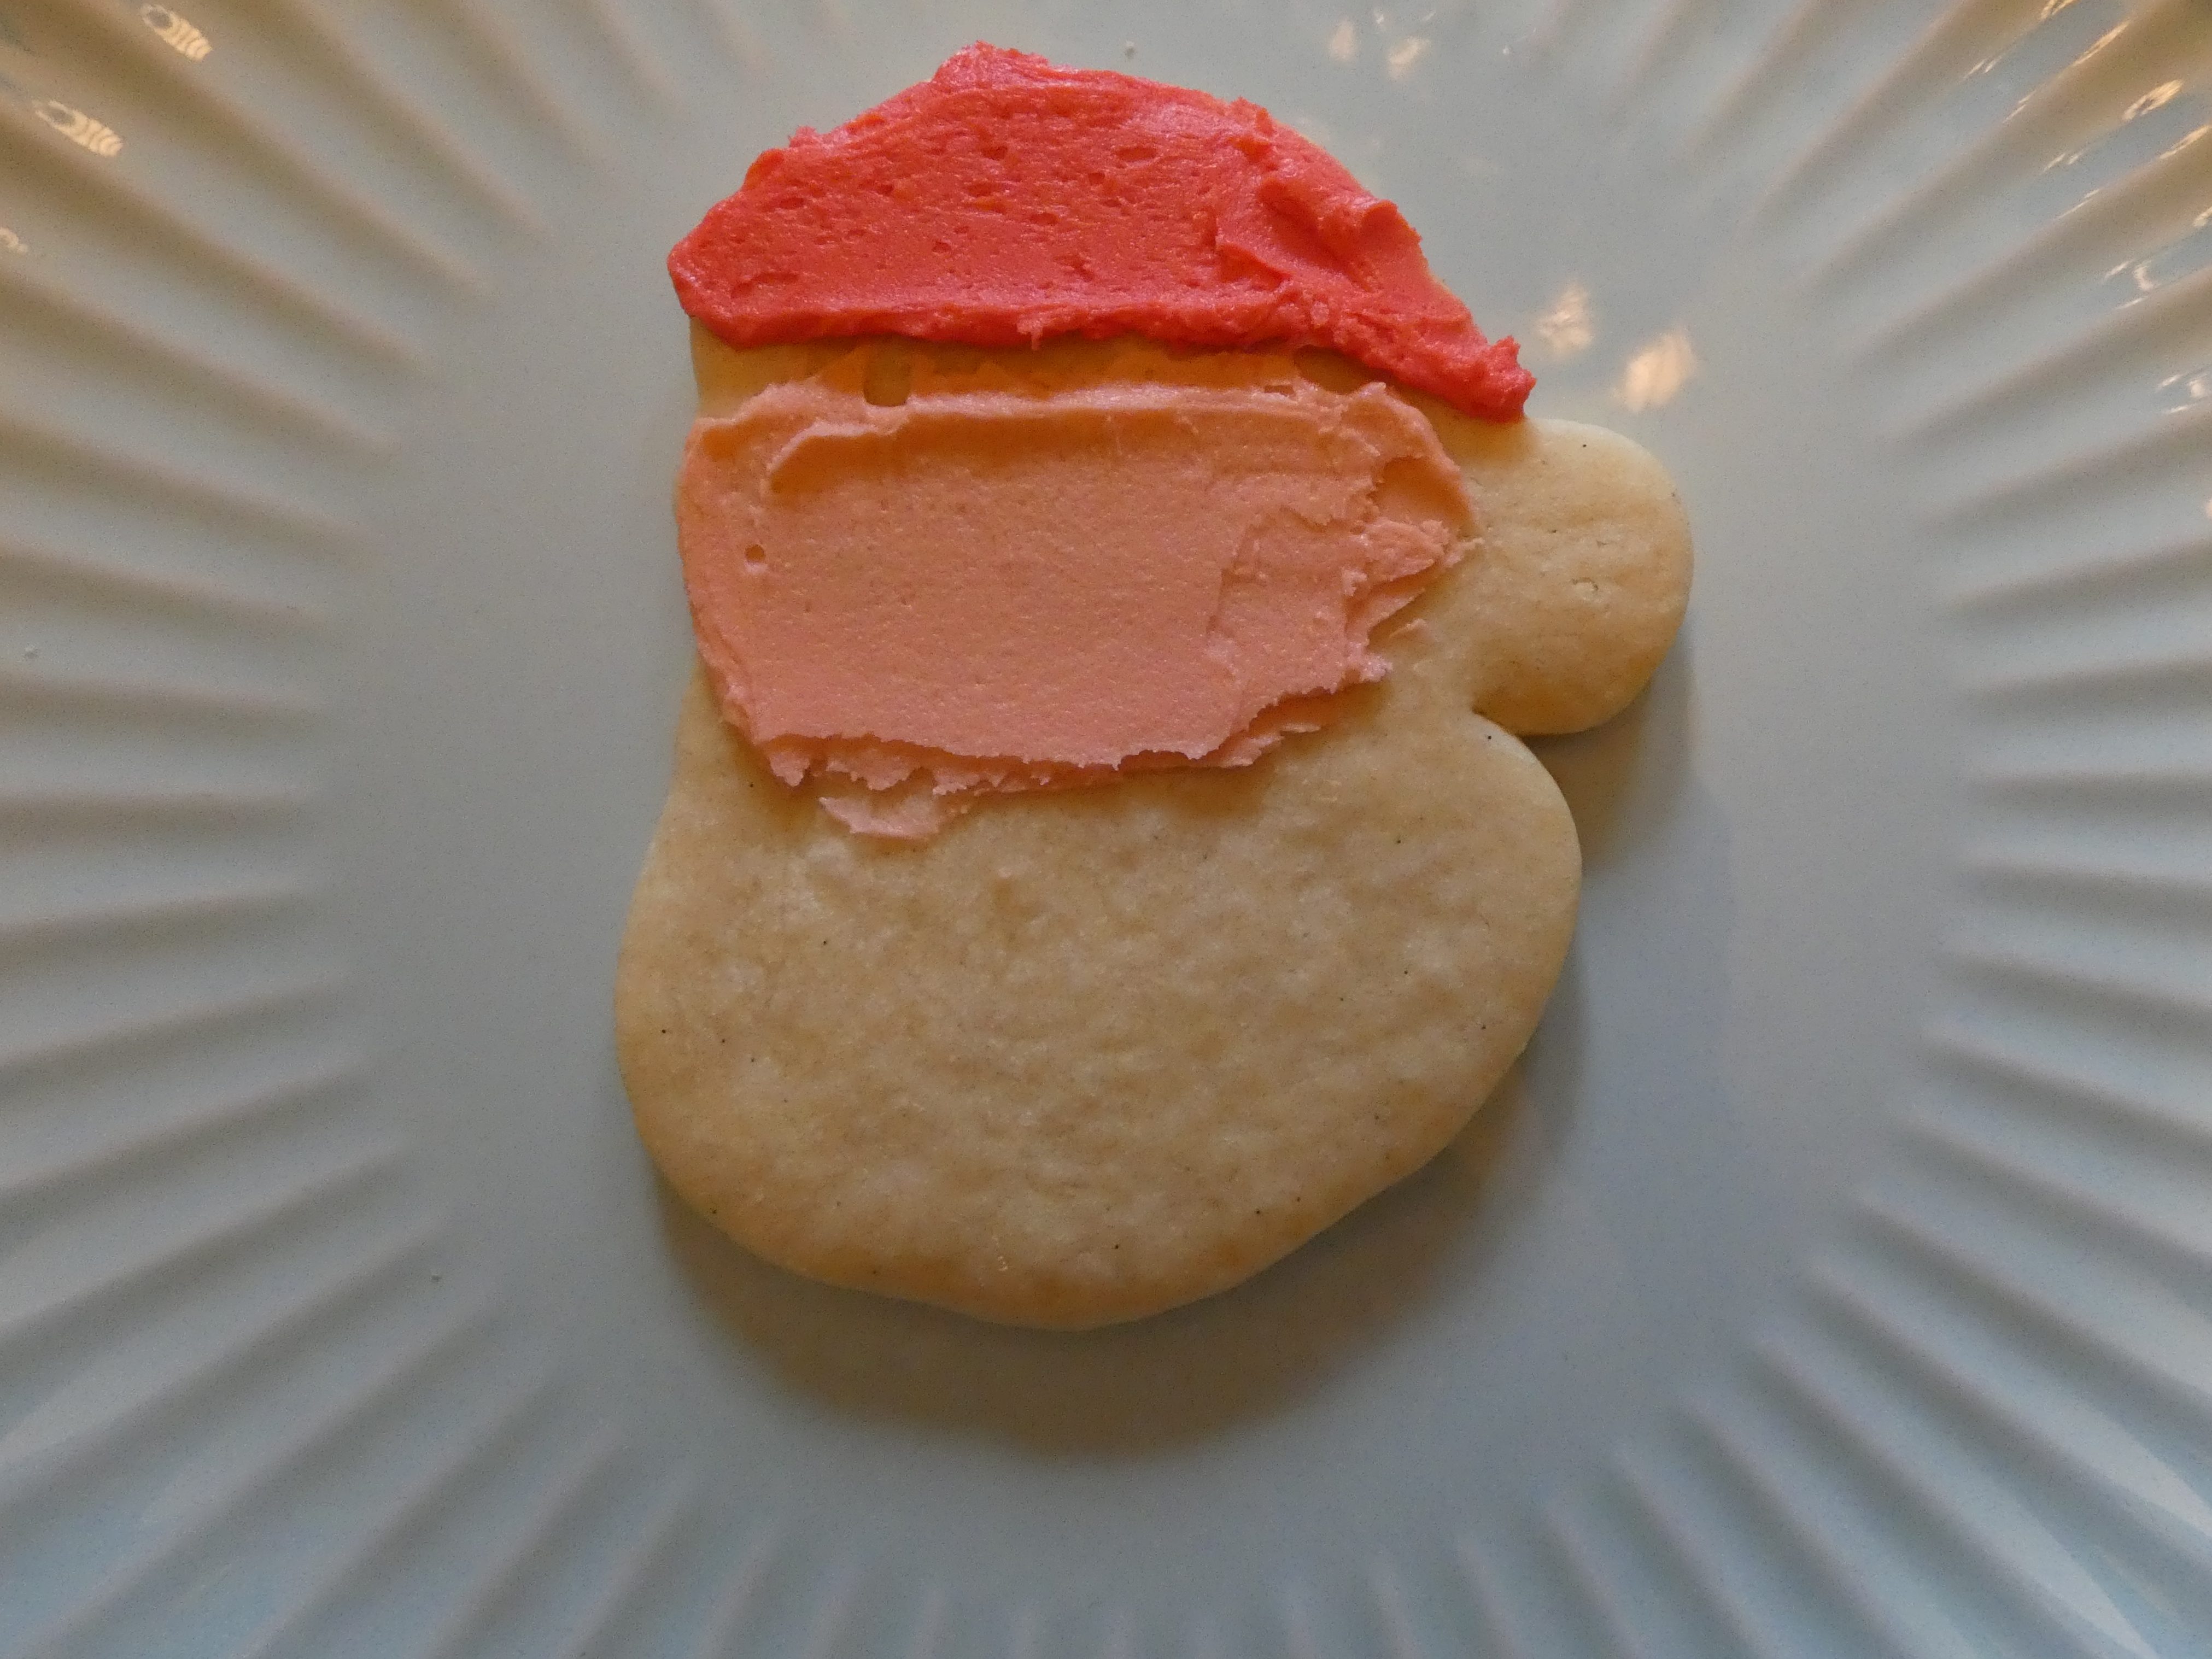
hat and face icing do not touch press eyes, roll nose ballAdd beard icing piped on with sandwich bagpiping with bag and star tipStep-by-Step Santa Cookies
Would you like to step up your sugar cookie game, but don’t want to buy or use a piping bag and tips? Are you also disgusted by the taste of Royal icing, preferring a tasty buttercream instead? These Santa cookies can be decorated with buttercream icing and the only tools necessary are cookie cutters, plastic sandwich bags, and some easy-to-find eyes.
I made my favorite sugar cookie recipe with the cookie cutters.
Next, I made buttercream icing and colored small portions red and flesh colored to match the photos above.
Then, the fun part started!
Spread the three different colors of icing to match the photos above. Avoid allowing the different colors to touch.
Decorate the faces by pressing the eyes into the frosting. This gives Santa a more natural look. Roll up a small ball of the flesh frosting for a nose.
Fill a plastic sandwich-sized or larger bag with some white frosting.
Cut off the tip, twist the top to remove as much air as possible.
Use icing to pipe on the edge of the hat, the ball at the end, sideburns and mustache. If you love a lot of icing, you could even use pipe on the beard.
If the icing seems to soft, put it back in the fridge for 10-15 minutes.
If you do have a piping bag and star tip, the results look a little fancier, but either cookie is clearly Santa!
Some posts on this site include affiliate links. If you click on a link and make a purchase, we may earn a small commission at no extra cost to you. Please know that the opinions expressed are entirely our own.
This recipe is versatile allowing easy spreading and piping. It is very sweet, so add a pinch or more of salt if you do not like sweeter icings.
Ingredients
2 pound package powdered sugar
2 sticks room temperature unsalted butter
1 tsp almond or vanilla extract
3/4 cup whole milk, half-and-half or cream
Directions
1. Whip the butter using an electric mixer for minute or two.
2. Place bowl in sink and carefully add powdered sugar, extract and about 1/4 cup of cream.
3. Mix on low until powdered sugar is incorporated. Gradually add more cream or milk until no powdered sugar is visible Scrape with a spatula.
4. Turn mixer up to high and whip, adding additional milk or cream until desired consistency. Peaks should hold their shape.
5. Add to bowls to color icing, then add to piping bags as needed.
6. To store, place clear plastic film directly on icing in bowls and cover with a fitted lid. The tips of piping can be covered with plastic film and bags stored in zippered bags. Frosting will keep up to two weeks.
My journey to easy meal preparation was not an easy one. I started by trying some “dump” recipes where you put all of the ingredients for an entire meal into a bag and then when you are ready to cook, you can just dump the whole thing in your slow cooker. The problem was some of the foods were overcooked, while others were undercooked. I eventually decided that any recipe with the word, “dump” was not a recipe for me.
I also tried freezing different casseroles and soups, but while there were some successes, many turned to mush. The other problem was that we like a lot of variety and, after having a meal, I usually didn’t want to repeat it for months. This is why I eventually learned to just freeze versatile ingredients that I can use in many of our favorite meals.
Why should I consider freezing these ingredients?
improves meal quality
increases meal variety
saves food prep time
reduces dirty dishes
saves money since you can buy in larger quantities or stock up when items are on sale
reduces food waste
often helps with portion control
How should I freeze the following items? It varies depending on the amount you expect to use at any one time. One idea is to freeze in portions and then move the frozen portions into zippered plastic bags.
Another space saver is to freeze in a zippered bag and then flatten the bag out before freezing so items can be stacked. Best of all, after the items are frozen, they could be stood upright in plastic bins similar to folders in a filing cabinet if your freezer allows this configuration.
Finally, when you expect to need larger amount, it works well to freeze in plastic or glass freezer containers. If you would like to do this, look for square containers since they use space more efficiently.
Some people prefer taking a day once a month to do all of their meal prep, but that isn’t for everybody. Most of the items listed below can be prepared in large quantities during the regular preparation of a meal and the unused portion frozen for future use.
Sausage Crumbles How to prepare: Cook bulk breakfast or chorizo sausage (i.e., no casing) in a skillet until fully cooked and crumbled. Cool and then freeze in plastic bags in the amounts you are likely to consume. How to use: pizza, soup, egg dishes, hash skillets, stuffed vegetables, casseroles, pasta, sandwiches or go here for more ideas 25 Best Ground Sausage Recipes
Shredded Chicken How to prepare: After cooking, shred chicken using the paddle attachment of your mixeror two forks. Freeze in flattened zippered plastic bags. How to Make Shredded Chicken How to use: soups and chilis, quesadillas, BBQ chicken sandwiches, wraps, burritos, nachos, chicken salad, chicken pot pie, BBQ chicken pizza, salads, bowls or go here for more ideas 50 Shredded Chicken Recipes
Italian Meatballs How to prepare: There are lots of great recipes to choose from. Here is mine: Kenda’s Spaghetti and Meatballs Please note that the marinara and meatballs should be frozen separately. How to use: spaghetti and meatballs, pizza topping, meatball sub sandwiches, sliders, soups, casseroles, or even shape the meatballs into meatloaf instead. Please go here for more ideas 42 Crazy-Good Dishes That Start with Frozen Meatballs
Taco Meat How to prepare: Follow directions on your taco spice package. Spanish Gardens makes my family’s favorite. Allow meat to cool completely and then freeze in flattened zippered plastic bags. How to use: tacos, burritos, quesadillas, nachos, enchiladas, pizza, pastas, casseroles, stuffed vegetables (e.g., zucchini, bell peppers), salad, soups, or go here for more ideas 25 Recipes You Can Make with a Pound of Taco Meat
Sloppy Joe Meat How to prepare: The BEST Sloppy Joe Recipe sauce described here. Freeze in flattened zippered bags. How to use: sandwiches, casseroles (e.g., Tater Tot), pasta topping, stuffed vegetables (e.g., peppers or zucchini, top french fries or corn chips, top rice or mashed potatoes, stuffed baked potatoes, or go here for more ideas 36 Ways To Repurpose Sloppy Joes Into Something New
Italian Meat Sauce How to prepare: Brown ground beef and mix with your favorite homemade marinara. One option is the sauce described here. Simply make without the meatballs and mix with the ground beef crumbles. Freeze in flattened zippered bags. How to use: pasta sauce, pasta casseroles (e.g., lasagna), pizza sauce, stuff vegetables (e.g., pepper, spaghetti squash, zucchini), mozzarella grilled cheese or go here for more ideas Ways to Use Leftover Pasta Sauce
Chili How to prepare: If you don’t have a favorite chili recipe already, here is an Easy Chili Recipe to try. My family loves Williams Chili Spice Mix and it makes chili night easy. Freeze in flattened zippered bags or plastic or glass containers. How to use: Baked potatoes, spaghetti topper with cheddar, chili dogs, crescent roll casserole, wraps, chili mac soup, over fries or corn chips, cornbread casserole, stuffed peppers, or go here for more ideas 20 Ways to Use Leftover Chili
Marinara Sauce How to prepare: There are so many tasty recipes, but the sauce described here is my favorite. I freeze some in flattened zippered plastic bags and some in muffin tins to use for pizza sauce. How to use: Cooking your own marinara allows you to create a thicker sauce that can be used for pizza or thinned a little for pasta sauces, casseroles. Marinara can also be used to top chicken parmesan, meatloaf, meatball sandwiches, and stuffed vegetables. Add even more water for soup. Please go here for more ideas 70 Meals that Start with a Jar of Pasta Sauce
Pesto Sauce How to prepare: Fresh Basil Pesto Freeze in ice cube trays or silicone muffin tins and then store in a zippered plastic bags. How to use: pizza, pasta topping, pasta casserole, top chicken or salmon, flavor vegetables, sandwich spread, soups, or go here for more ideas: 25 Things to Make with Pesto
Condensed Chicken Stock How to prepare: I keep a bag in my freezer where I can quickly stuff leftovers such as chicken bones/carcass, dill and parsley stems/leaves, celery, carrots, and onions. This allows me to make a rich chicken stock. Condensed Chicken Stock can be frozen in ice cube trays or muffin tins. Just be sure that you know how much water to add to each cube. How to use: Soups, gravies, and sauces are obvious, but stock can also be used in casseroles, skillets, chicken pot pies and other ideas listed here 40 Recipes with Chicken Stock to Use up the Box
Cooked Rice How to prepare: Cook brown or white rice according to package directions, then thoroughly cool. Freeze in zippered plastic bags, removing as much air as possible. Use immediately after removing from the freezer. How to use: fried rice, topped with stir fry, with beans, soups, casseroles, skillets, stuffed vegetables, topped with etouffee or gumbo or go here for more ideas 35 Ways to Use Leftover Rice
Mashed Potatoes How to prepare: The most important thing is to use the right kind of recipe. This recipe uses sour cream and cream cheese instead of milk/cream which prevents grainy mashed potatoes upon thawing. Potatoes could be frozen in a flattened zippered bag or in a silicone muffin tin and then transferred to a large zippered bag. How to use: as a side, topped with meatballs or chicken and gravy, topping Shepard’s pie, casseroles, potato cakes/croquettes, breads, dumplings, waffles, pancakes, soups, gnocchi, pierogi, or go here for more ideas: 35 Easy Ways to Use Leftover Mashed Potatoes
Aromatics How to prepare: The aromatics to use depends on how you most frequently flavor your meals. For guidance, please see Freezing Aromatic Flavor Cubes for Asian Stir-Fry Suppers and All About Mirepoix, Sofrito, Battuto, and Other Humble Beginnings. Caramelized onions can be frozen in a silicone muffin tin and then transferred to a zippered plastic bag. Roasted garlic can be frozen in an ice cube tray, as can citrus juice, with or without its zest. Herbs can be minced and frozen in an ice cube tray and some butter or oil added, depending on what is most appropriate for each herb (e.g., butter in dill, canola in parsley, olive oil in basil). Garlic and herb cubes can then be transferred to a zippered plastic bag. How to use: Most work well in a variety of soups and sauces. Here are some additional uses for the different types of aromatics: Asian (stir fry, noodles, fried rice), Mirepoix (chicken pot pie, roasted poultry and dressing), Spanish Sofrito (arroz con pollo, eggs, paella), Holy Trinity (jumbalaya, gumbo, etoufee, red beans and rice), caramelized onions (any recipe that requires you to cook an onion until softened), roasted garlic (any recipe that requires you to cook minced garlic until aromatic), fresh minced herbs (any dish that is finished with fresh herbs like parsley, dill or basil), citrus juice (any dish finished with a bit of fresh citrus).
Some posts on this site include affiliate links. If you click on a link and make a purchase, we may earn a small commission at no extra cost to you. Please know that the opinions expressed are entirely our own.
I have been wanting to build a gingerbread house for literally decades. I decided this was the year. I absolutely underestimated the amount of work, but I ended up being pleased with the final product. I think the key to creating a house that I love was layering inexpensive decorations, mostly purchased from dollar stores and Wal-mart. Let me share with you some specific details and also let you know where I purchased many of the decorations
The front door is a breakfast biscuit from Dollar Tree which is a generic for Belvita biscuits. It has a dragees doorknob and royal icing wreath. Above the door is a tree sprinkle on a peppermint and a bell made from a yellow gumdrop and a dragees. The garland is green royal icing, sugar pearls, and some large sixlet-like candies from the cake decorating section at Wal-mart.The “Joy” banner is attached to a large pretzel rod. Above the banner are gingerbread man sprinkles on peppermints. A snowflake is on either side of the banner with a dragees in the center.The clock is made from a chocolate-covered graham cracker, topped with a vanilla cookie, topped with a mint candy. Hands were piped from royal icing and are centered with a heart sprinkle.The stained glass windows were made from pouring edible glass windows and then quickly sprinkling chopped lifesavers and jolly ranchers into the hot syrup. Cutting a hole in the back of the house allowed a string of lights to be inserted for a magical glow at night. The best thing about these lights is that they are battery operated, so you don’t have to worry about being near an outlet AND they operate on a timer so only light up for about six hours per day which allows the batteries to last for about 3-4 weeks. Using rechargeable batteries will keep the cost down over time.The window box is a vanilla sugar wafer with smartees and sprinkles glued to the front with royal icing. A strawberry pocky stick forms the candle. The green royal icing is decorated with sprinkles and a large royal icing flower.Windows are topped with half a vanilla cookie, a Haribo cherry heart candy, and dragees. Pirouline wafers are between the windows. The chimney is an ice cream cone filled with royal icing and a Haribo cherry heart candy on top.The chimney is an ice cream cone filled with royal icing and a Haribo cherry heart candy on top.The house features pink swirl lollipops on either corner of the house. The pastel marshmallows line the roof’s edge. Royal icing is highlighted with dragees in many places. Chocolate sugar wafers form the front stairs.
Where did you find the _____?
These candies, cookies, and sprinkles were mostly purchased from Dollar Tree, Dollar General and Walmart. Exceptions were the Haribo Herzbeben heart candies from World Market and the silver dragees Not pictured were the Great Value alphabet cookies from Walmart which spell out “JOY”, the pink swirl lollipops, and the large royal icing snowflakes and pink flowers purchased on Etsy.
Some posts on this site include affiliate links. If you click on a link and make a purchase, we may earn a small commission at no extra cost to you. Please know that the opinions expressed are entirely our own.
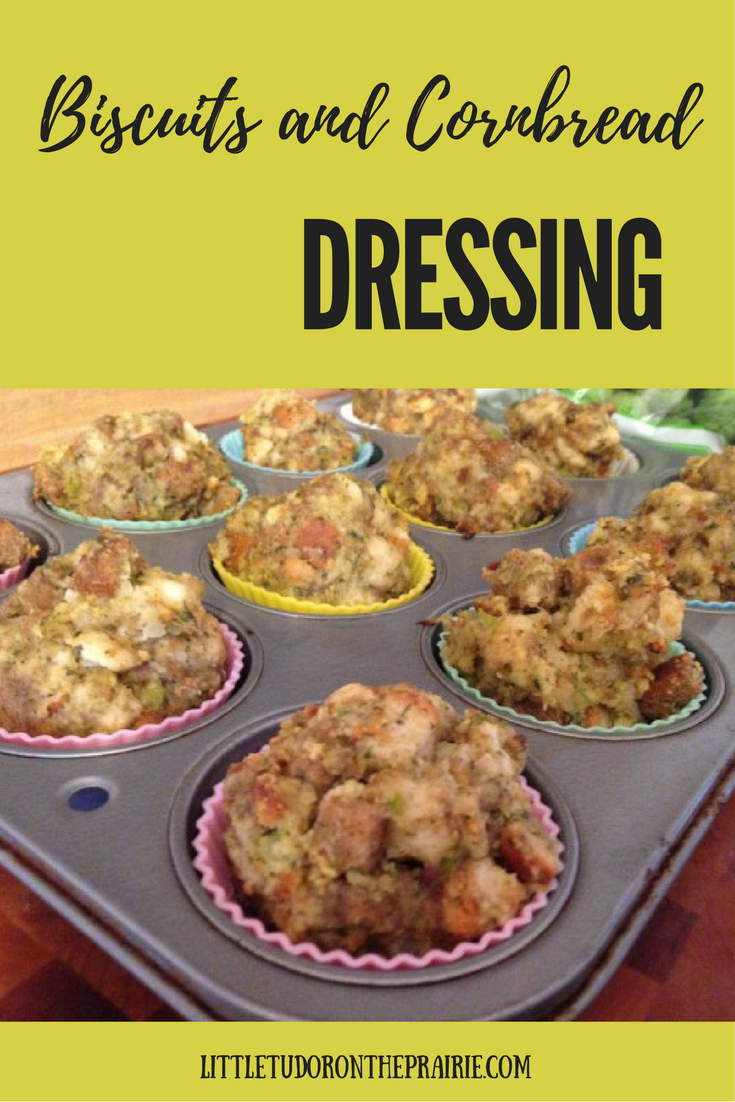
Can’t decide between cornbread dressing or traditional bread stuffing? Here is a recipe that combines the best of both! Please also see the included printable recipe.
Living in the center of the Heartland can make Thanksgiving a little confusing. Should I make a cornbread dressing like they make in the South or a bread stuffing that is more common in the North? My family has roots on both sides of the Mason-Dixon line, so choosing one or the other means somebody isn’t happy.
Unfortunately, I couldn’t just prepare the family recipe because it was no more than a list of ingredients. No quantities were listed. Well, unless you count my grandmother’s not at all helpful “ten cents worth of sausage”…and I don’t.
So, I struck out my own. I researched on-line, asked friends to share their favorites, and made batch after batch of dressing over several years. I am happy to report that I finally perfected my favorite by piecing together components of several different recipes. Everyone who has tasted it raves about the flavor.
The main secret to this dressing recipe is the use of biscuits AND cornbread AND dried stuffing cubes. In a nod to my grandmother, I do use sausage, but not ten cents worth. It turns out that 12 ounces of raw breakfast link sausages works well. Oddly enough, after removing the casings and mixing the raw sausage into the dressing, it is not readily apparent that sausage is even in the dressing, but it adds a LOT of flavor.
I strongly recommend making this as a dressing baked in a dish separate from your turkey. Because this recipe contains both raw sausage and an egg, it cannot cook to a safe temperature when used to stuff a turkey.
Here is a nifty little trick that I learned from my mother and grandmother–start with the minimum amount of salt and poultry seasoning. Then, after you mix the dressing, form a small amount into a little pancake and fry it it in a little butter to cook the egg and sausage. This will allow you to taste it and decide if you prefer more salt and/or poultry seasoning.
This recipe makes an ENORMOUS amount of dressing. I usually fill a 9 x 12 inch dish with the dressing for Thanksgiving day and then use the rest to make some Stuffing Muffins. These freeze exceptionally well. Since I also freeze some cooked turkey, we are all set to enjoy some quick turkey dinners all winter long.
You might also want to save a cup or so of dressing to add to your gravy. It helps gravy to thicken while adding additional flavor. Just be sure to let it simmer until it is dissolved.
Serves 18
Ingredients:
10 ounces refrigerated biscuits, baked according to package directions,
8 1⁄2 ounces Jiffy cornbread mix, baked according to package directions,
1 egg, for cornbread mix,
1⁄3 cup milk, for cornbread mix,
1⁄2 cup butter,
1 onion, minced in food processor,
3-5 stalks celery, chopped fine in food processor,
1/2-1 teaspoon salt,
12 ounces breakfast sausage links, raw (slit casings and remove meat, discard casings),
1 egg,
1.5-2 tablespoons poultry seasoning,
1⁄4 cup dried parsley flakes,
12 ounces herb-seasoned or country-style CUBED stuffing,
4 -6 cups chicken broth,
Instructions:
The day before:
1. Bake cornbread and biscuits using the instructions on the label.
2. Cool and roughly chop biscuits into large cubes.
3. Let biscuits and cornbread sit out uncovered overnight to dry (or put in cooled oven).
The next day:
1. Preheat the oven to 350.
2. Melt butter in a pan over medium heat.
3. Add onions, celery, and salt.
4. Saute, stirring occasionally, for about 10 minutes until soft.
5. Scramble egg in a very large mixing bowl.
6. Add raw sausage with the casings removed, poultry seasoning, and parsley. Mix well.
7. Add cubed stuffing and mix well.
8. Lightly toss with chopped biscuits and cornbread.
9. Add broth and mix again. Avoid over mixing, but incorporate most of broth for a heavier dressing, less for a slightly fluffier dressing.
10. Place in a large baking dish and bake uncovered for about 45 minutes-1 hour at 350. The top should be light brown. Alternatively, portion some or all of the dressing into a muffin tin lined with cupcake liners. Bake for about 30 minutes. If you put half of the dressing in a muffin tin and the other half in a regular baking dish, the dressing in a baking dish will take about 30-40 minutes to bake.
Due to raw egg and pork, do not stuff a turkey with this recipe.
10 ounces refrigerated biscuits, baked according to package directions
8 1⁄2 ounces Jiffy cornbread mix, baked according to package directions
1 egg, for cornbread mix
1⁄3 cup milk, for cornbread mix
1⁄2 cup butter
1 onion, minced in food processor
3-5 stalks celery, chopped fine in food processor
1/2-1 teaspoon salt
12 ounces breakfast sausage links, raw (slit casings and remove meat, discard casings)
1 egg
1.5-2 tablespoons poultry seasoning
1⁄4 cup dried parsley flakes
12 ounces herb-seasoned or country-style CUBED stuffing
4 -6 cups chicken broth
The day before:
1. Bake cornbread and biscuits using the instructions on the label.
2. Cool and roughly chop biscuits into large cubes.
3. Let biscuits and cornbread sit out uncovered overnight to dry (or put in cooled oven).
The next day:
1. Preheat the oven to 350.
2. Melt butter in a pan over medium heat.
3. Add onions, celery, and salt.
4. Saute, stirring occasionally, for about 10 minutes until soft.
5. Scramble egg in a very large mixing bowl.
6. Add raw sausage with the casings removed, poultry seasoning, and parsley. Mix well.
7. Add cubed stuffing and mix well.
8. Lightly toss with chopped biscuits and cornbread.
9. Add broth and mix again. Avoid over mixing, but incorporate most of broth for a heavier dressing, less for a slightly fluffier dressing.
10. Place in a large baking dish and bake uncovered for about 45 minutes-1 hour at 350. The top should be light brown. Alternatively, portion some or all of the dressing into a muffin tin lined with cupcake liners. Bake for about 30 minutes. If you put half of the dressing in a muffin tin and the other half in a regular baking dish, the dressing in a baking dish will take about 30-40 minutes to bake.
Due to raw egg and pork, do not stuff a turkey with this recipe.
littletudorontheprairie.com
I hope that you enjoy this dressing, at Thanksgiving or anytime of the year.
Happy Cooking!
Some posts on this site include affiliate links. If you click on a link and make a purchase, we may earn a small commission at no extra cost to you. Please know that the opinions expressed are entirely our own.
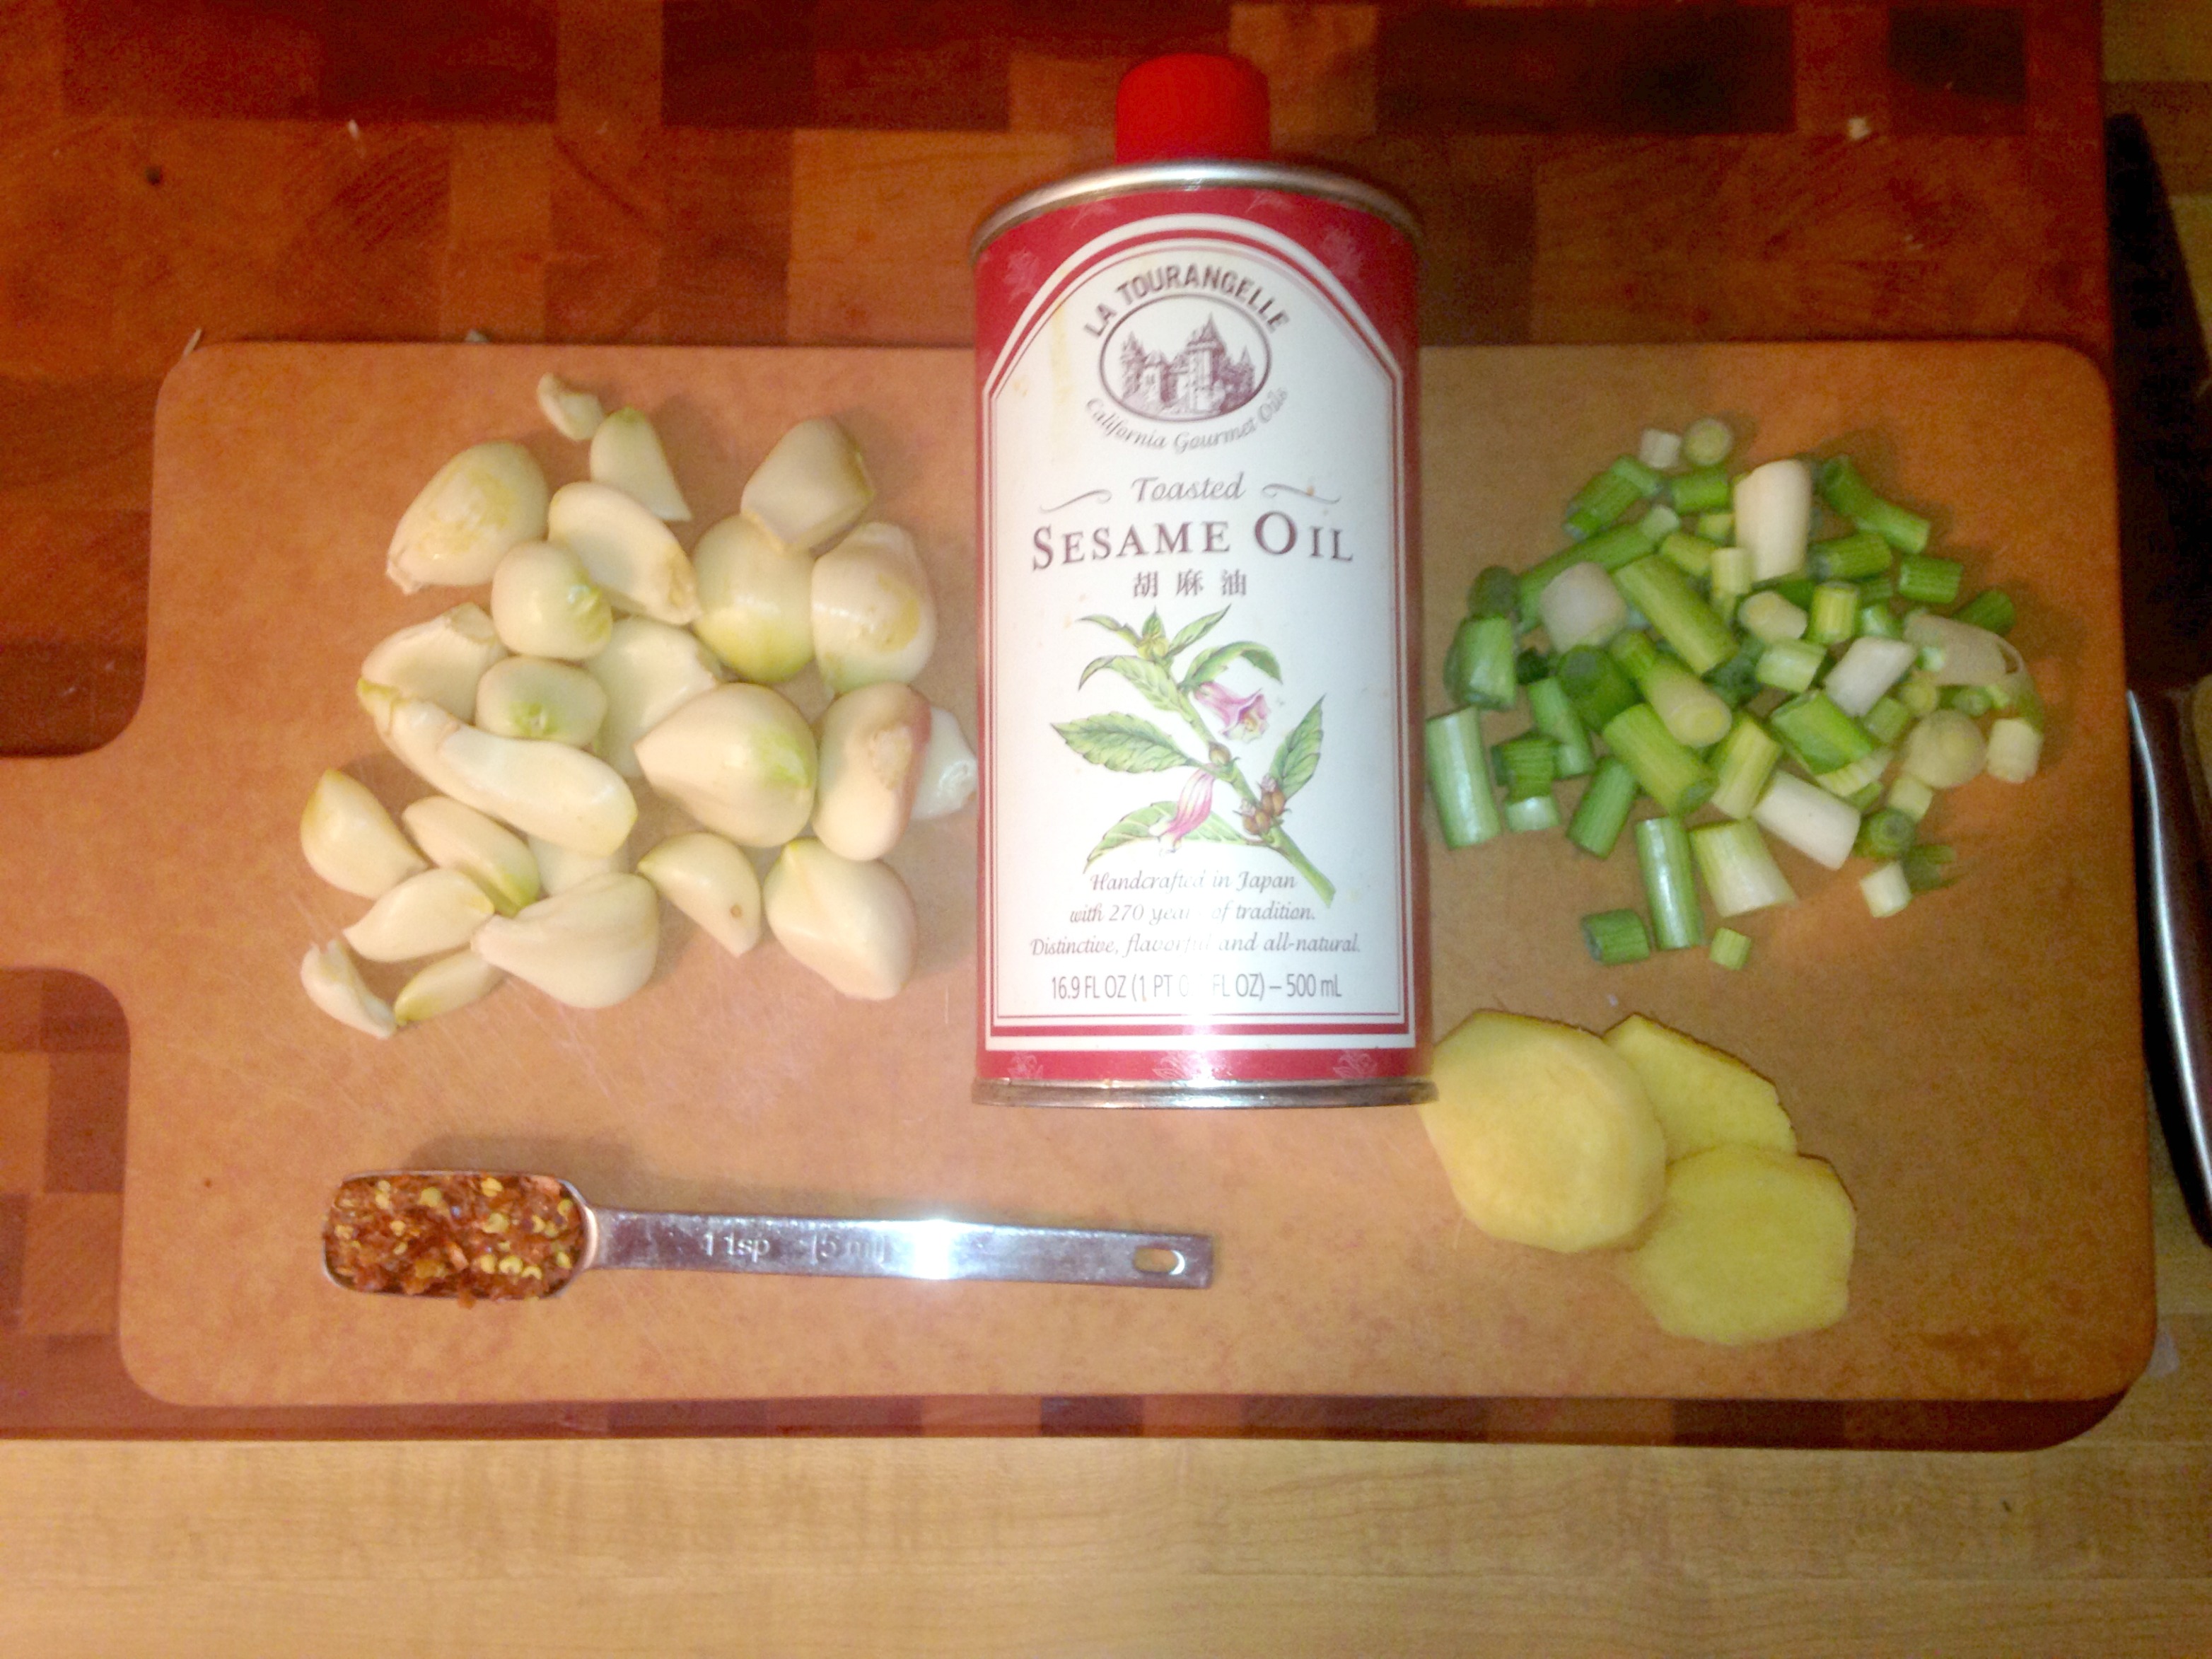
Do you love stir fry, but find the prep work tedious? I felt the same way until I learned some easy short cuts that not only cut back on my prep time, but also meant less clean up time. One of those short-cuts involved the mixture of garlic, ginger, scallions, and red pepper flakes that add complex flavors to my stir fries. No matter what meat or vegetables I cook in my stir fry, I always make a little well in the center and quickly fry some aromatics in it before adding a sauce. Unfortunately, it takes a long time to mince the aromatics small enough that we don’t end up biting into a big, unappetizing hunk of garlic or ginger. I could use the food processor, but I don’t want to get it dirty for such a small job. I also don’t want to have to buy ginger every time we have a stir fry and ginger doesn’t really last all that long. The solution that works for us is to prepare enough aromatics for several stir fry dinners at once and then freeze them in ice cube trays.
Ingredients
4 heads peeled garlic (about 8 oz once peeled or 1 cup minced)
2 oz peeled ginger (about 1/4 cup minced)
Whites of 16-20 scallions
1 TB red pepper flakes (optional, adjust according to heat preferences)
¼ cup sesame oil
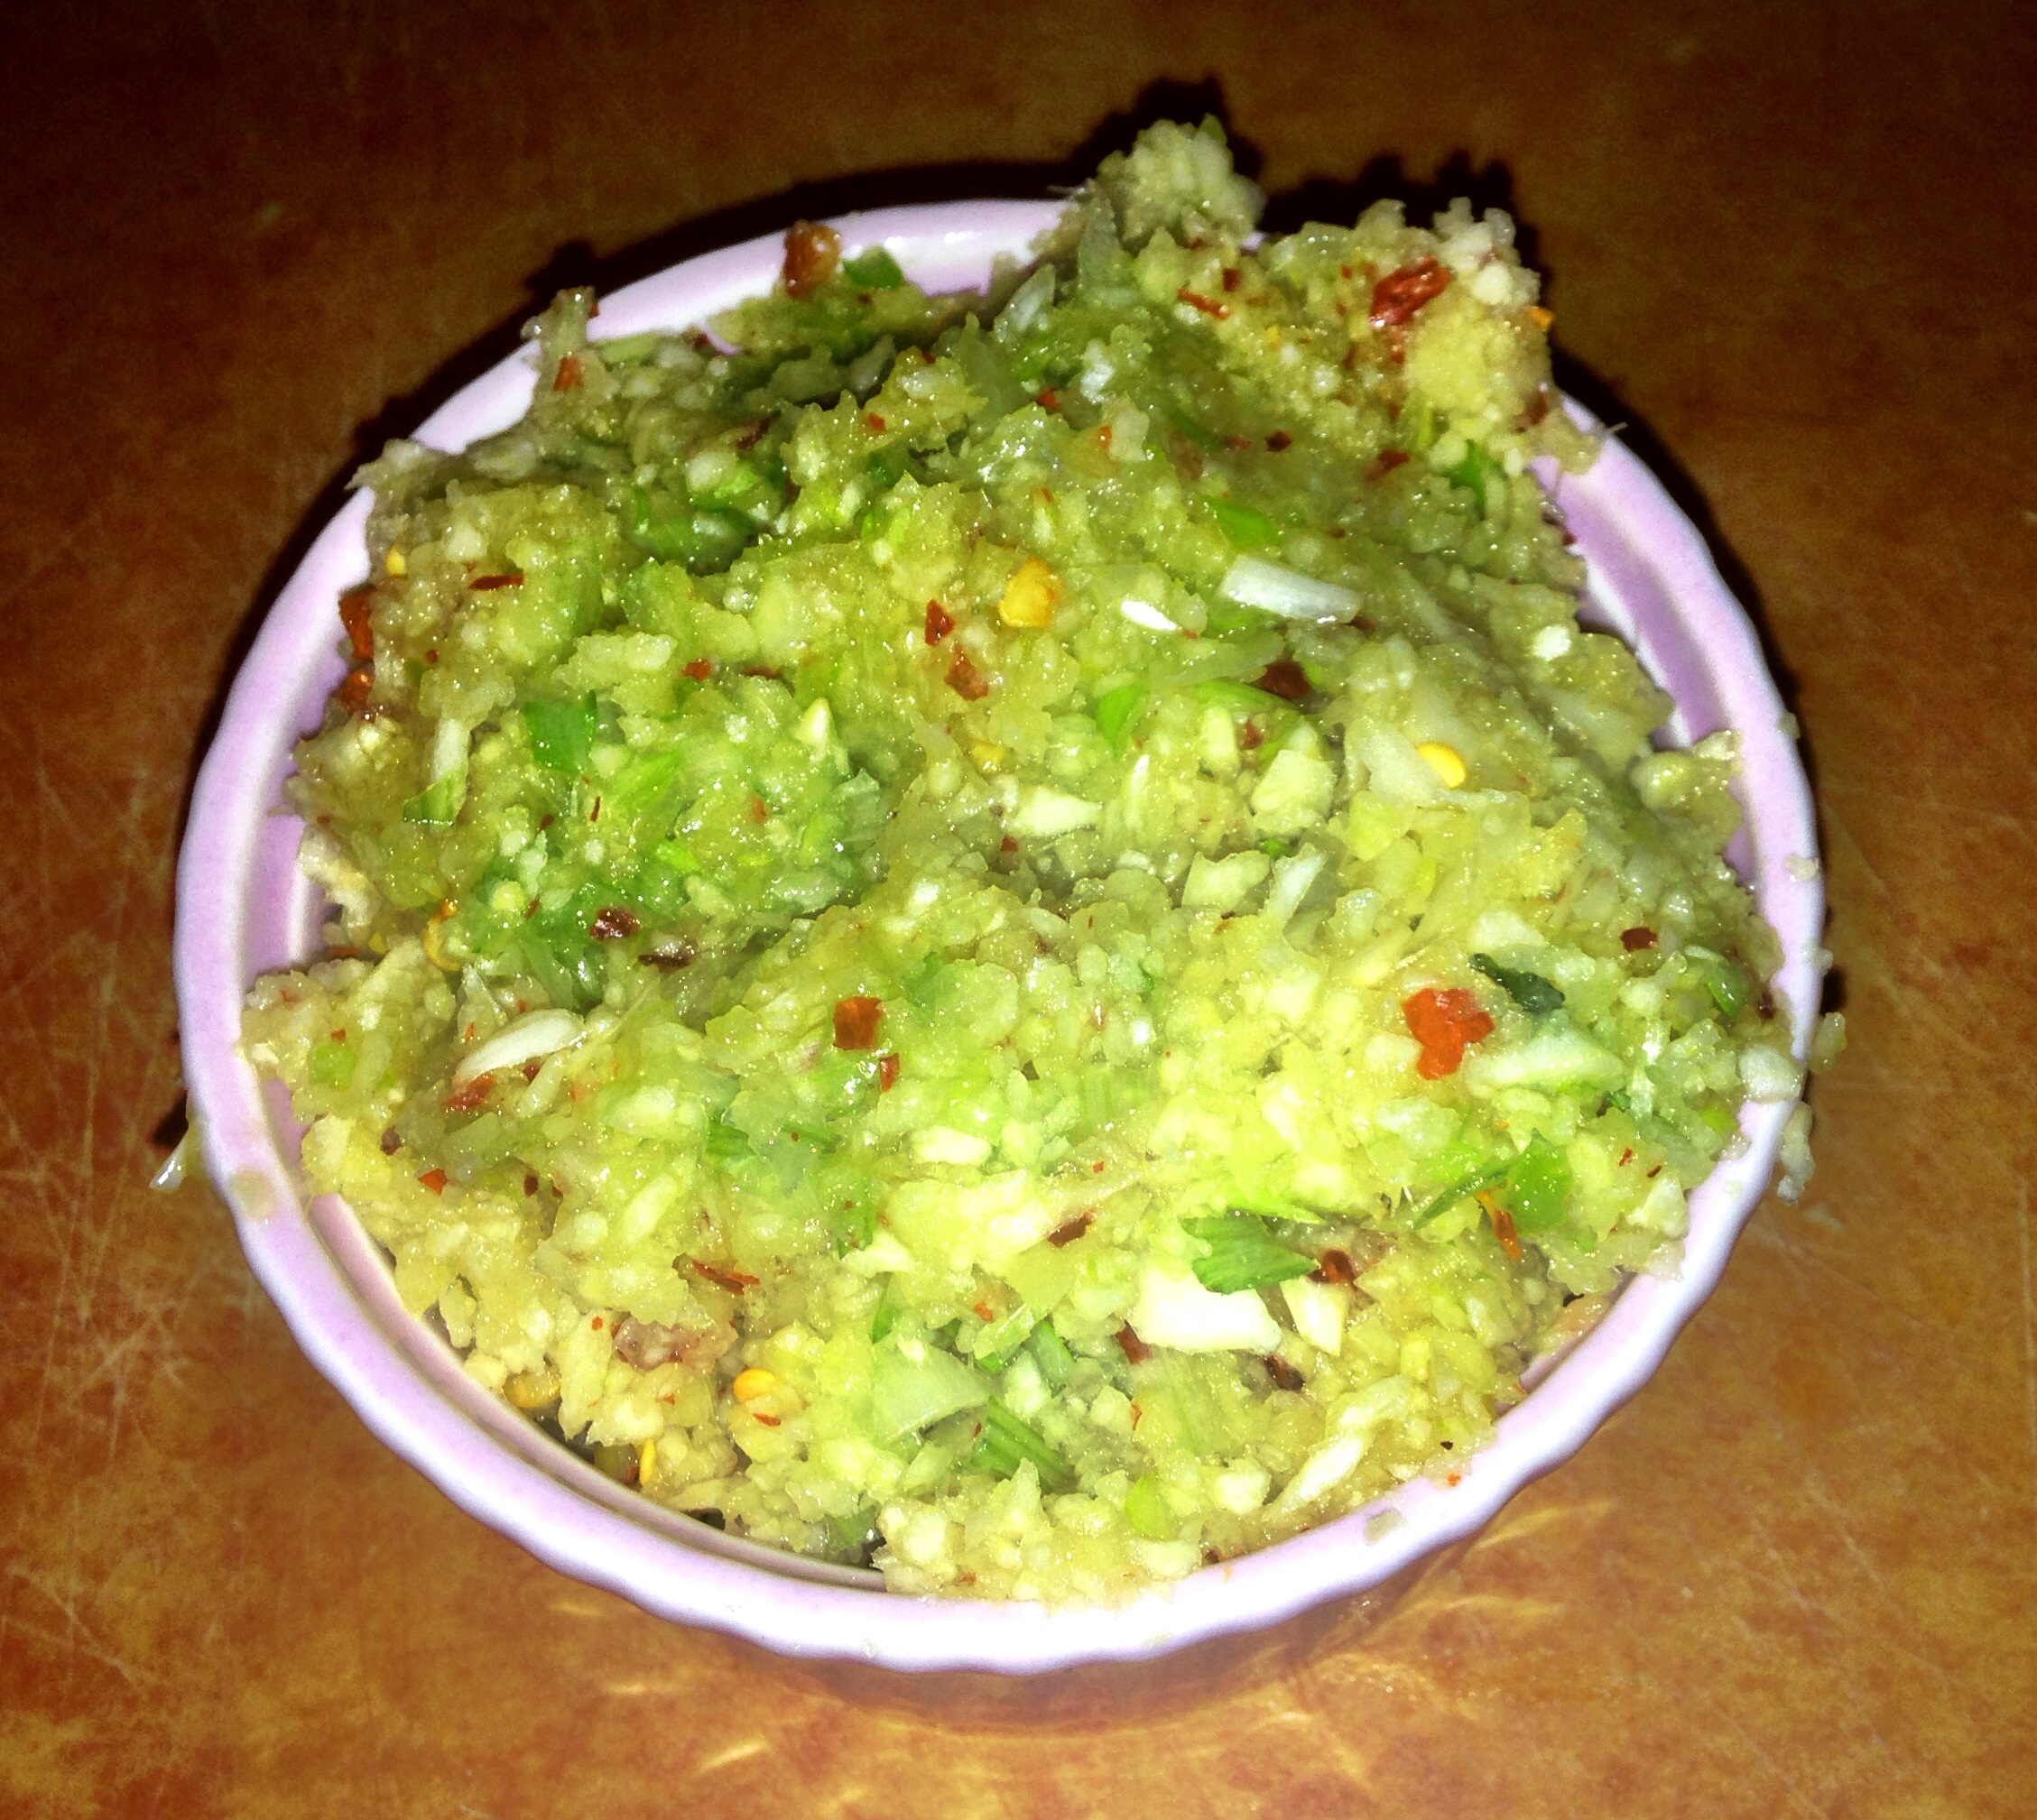
Unless you love chopping food into tiny bits, use a food processor to mince the garlic, ginger, scallions, and red pepper flakes. I try to process until it is just short of a puree.
Spoon the mixture into an ice cube tray in 1 TB portions, making about 18 portions. Press the aromatics in tight and then spread the sesame oil over the top where it can soak in and fill in any holes before freezing.
When you are ready to make a stir fry, get an aromatic flavor cube out as soon as you start cooking. This will allow it to thaw a little before mixing into your stir fry. I set the cube near the pan to help the thawing process. This mixture can also be used to flavor a marinade for grilling meat.
Simplify stir fry with aromatic flavor cubes. Happy Cooking!
Some posts on this site include affiliate links. If you click on a link and make a purchase, we may earn a small commission at no extra cost to you. Please know that the opinions expressed are entirely our own.
I fell in love with Asian food the first time that I ate it. And by first time, I am not referring to the canned chow mein that moms like mine served in the 1970s. No, I fell in love with real Asian cooking at the homey Asian restaurants I could not afford to visit very often during my years as a poverty-stricken university student. So, I decided that I would make my own. How hard could it be? I added chicken, a ton of different vegetables at once, and doused the pan with stroke-inducing amounts of soy sauce before eating the whole mushy mess over Minute Rice. Let’s just say, it was a bit disappointing.
Once I finally learned how to properly make a stir-fry, I realized that it is not so hard once you understand some very basic steps. Once you master those basic steps, the options for a successful dinner are endless. We have a stir-fry at least once a week and every one is at least a little different than the last. Additionally, stir-fry is a fairly healthy cooking method of cooking. It can be accomplished with minimal fat and you can include a large portion of vegetables in your final dish. This post is not a recipe for stir-fry, but rather a general description of the method, so that you can pull together a stir-fry from ingredients that you have on hand. Here are some ingredients to keep on hand:
Some ingredients that are useful when concocting a stir-fry.
A stir-fry also does not require any special equipment. I recall a college classmate who was from Asia laughing at the idea of using a wok. She said that she just used a large skillet. You will be cooking over high heat, however, so non-stick is not advisable since they usually should not be used over medium heat. Something like triple-ply stainless steel or cast iron would work well. I don’t think cast iron is difficult to care for, but if you have concerns, consider the more expensive enameled cast iron. If you would like to use something more like a wok, I recently bought this cast-iron Balti dish and I love it, even though I did well with a regular pan for decades. You will also need a knife, cutting board, measuring cups and spoons, and a wooden spoon.
If you are going to make rice or noodles with your stir-fry, start preparing that first because you want it to be done before your stir fry. As long as you drain the noodles or keep the rice covered and off-heat, they will not be ruined while you finish your stir-fry. Your stir-fry, however, will be ruined if you are waiting for your starch to cook before you eat it. One final note, I beg you to use a delicious rice like jasmine, but basmati, brown or long-grain rice will all do. I deeply regret all the years that I wasted eating tasteless Minute rice. I stock up on a large bag of jasmine rice at the Asian market about an hour from where we live, but I have also seen jasmine rice for a good price at our small Wal-mart. Cook’s Illustrated recommends Dynasty jasmine rice
Step 1. Prepare all of your ingredients BEFORE you start cooking. Once you start cooking, things move quickly and you will not have time to quickly chop some more vegetables without ruining what you already have in the pan. You can choose from a lot of different proteins, but our favorites are chicken breast, shrimp, steak, pork chops, and tofu. All of these will brown best if you dry them out with some paper towels before cooking. You will also want to chop up your vegetables into bite-sized pieces. This is probably the most tedious part of preparing a stir-fry, but there are lots of options to avoid this. For instance, you can buy pre-cut vegetables in the produce, salad bar, or frozen section of your supermarket. There are even some canned options to keep on hand like water chestnuts, bamboo shoots, and baby corn. One of my favorite strategies is to buy vegetables that are already bite-sized, like sugar snap peas. It is usually best to use only 2-3 types of vegetables.
My number one suggestion for making stir-fry prep easy is to keep Asian Aromatic Flavor Cubes in your freezer. This allows you to prepare your garlic, ginger, scallions, and red pepper only once for a total of 18 stir-fry nights. If you have some flavor cubes, get one out now to thaw.
Be sure to go ahead and mix your sauce in a liquid measuring cup at this time, as well. Please see the end of this post if you need a sauce recipe.
Step 2. Heat 1 TB canola oil over medium high heat. Watch this very carefully and add your protein IMMEDIATELY when you see a tiny bit of smoke coming off the pan. You need to add right away when this happens because letting your oil smoke for too long could lead to a fire. It’s important to have a really hot pan, however, if you are going to get a nice sear on your protein. Once you add the protein, wait at least a couple of minutes before stirring; it is ready to stir when it isn’t sticking to the pan too much. Then, stir every 1-2 minutes until the protein is just cooked. You will then need to remove the protein from the pan to keep it from being overcooked and to give the vegetables a chance to cook evenly. I skipped this step for years because I didn’t want to dirty another plate, but that was a big mistake. Now, I just use one of the plates that we will be using for dinner.
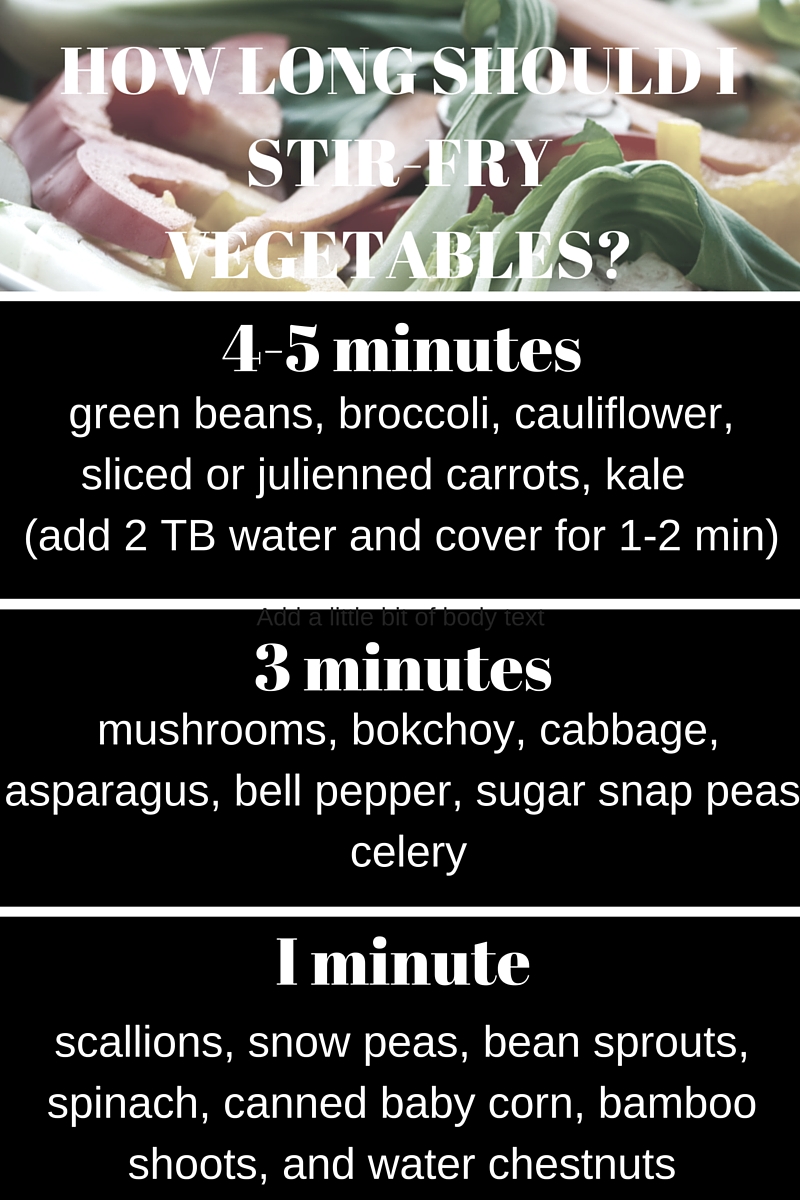
Step 3. Heat another 1 TB canola oil until you see it shimmer in the pan and then add your vegetables. This part can get a little tricky because you don’t want to add all of your types of vegetables at once. If you do, then some will be overcooked and some will be undercooked. There are also individual differences in how crisp people like their vegetables, but hopefully this chart will be a good starting point.
Step 4. Use your wooden spoon to create a well in the middle of the vegetables. Add your Asian Aromatic Flavor Cube OR add 1 tsp. canola oil or sesame oil and then immediately add your aromatics. Aromatics include garlic, ginger, red pepper flakes, and the white part of scallions. If you aren’t sure how much to use of each aromatic, I recommend about 1 TB minced garlic, 1 tsp minced ginger, 2-3 scallion whites, and/or a pinch of red pepper flakes. Mash this mixture around in the well for about 30-seconds-1 minute until the ingredients become aromatic (see what I did there?). Then, mix all of the vegetables in with the aromatics.
Step 5. Give your sauce a quick stir, making sure the cornstarch is incorporated. Then, add the sauce and protein into the pan. Stir for about 1-2 minutes, just until the sauce slightly thickens.
If desired, you can add a garnish such as chopped scallion greens, bean sprouts, herbs, nuts, or seeds to your final dish.
Do you need a sauce recipe? There are so many interesting and complex sauces out there, that I almost hate to share this one because it is quite basic. However, it is a good sauce to start with because it is versatile, and has just a few easy-to-find ingredients.
1 cup chicken broth (Better than Bouillon soup starter is an acceptable substitute)
1 heaping TB cornstarch
1/4 cup soy
2 TB brown sugar
1 TB rice vinegar
Kicking it up a notch:
Use peanut oil, instead of canola since it tolerates a higher temperature.
Use sauce recipes with more interesting ingredients like rice cooking wine (e.g., sake, mirin), oyster sauce, fish sauce, curry powder or paste, coconut milk, hoisin, or chili sauce.
Some posts on this site include affiliate links. If you click on a link and make a purchase, we may earn a small commission at no extra cost to you. Please know that the opinions expressed are entirely our own.