Biscuits and Cornbread Thanksgiving Dressing

biscuits-and-cornbread-dressing

Biscuits and Cornbread Thanksgiving Dressing

Can’t decide between cornbread dressing or traditional bread stuffing? Here is a recipe that combines the best of both! Please also see the included printable recipe.

Living in the center of the Heartland can make Thanksgiving a little confusing. Should I make a cornbread dressing like they make in the South or a bread stuffing that is more common in the North? My family has roots on both sides of the Mason-Dixon line, so choosing one or the other means somebody isn’t happy.

Unfortunately, I couldn’t just prepare the family recipe because it was no more than a list of ingredients. No quantities were listed. Well, unless you count my grandmother’s not at all helpful “ten cents worth of sausage”…and I don’t.

So, I struck out my own. I researched on-line, asked friends to share their favorites, and made batch after batch of dressing over several years. I am happy to report that I finally perfected my favorite by piecing together components of several different recipes. Everyone who has tasted it raves about the flavor.

The main secret to this dressing recipe is the use of biscuits AND cornbread AND dried stuffing cubes. In a nod to my grandmother, I do use sausage, but not ten cents worth. It turns out that 12 ounces of raw breakfast link sausages works well. Oddly enough, after removing the casings and mixing the raw sausage into the dressing, it is not readily apparent that sausage is even in the dressing, but it adds a LOT of flavor.

I strongly recommend making this as a dressing baked in a dish separate from your turkey. Because this recipe contains both raw sausage and an egg, it cannot cook to a safe temperature when used to stuff a turkey.

Here is a nifty little trick that I learned from my mother and grandmother–start with the minimum amount of salt and poultry seasoning. Then, after you mix the dressing, form a small amount into a little pancake and fry it it in a little butter to cook the egg and sausage. This will allow you to taste it and decide if you prefer more salt and/or poultry seasoning.

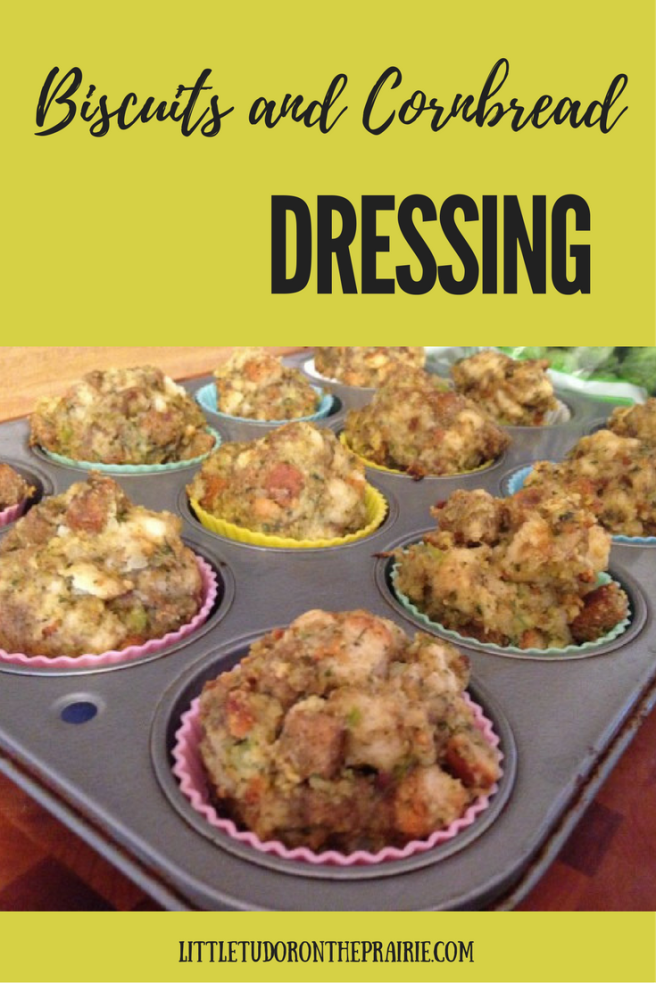
This recipe makes an ENORMOUS amount of dressing. I usually fill a 9 x 12 inch dish with the dressing for Thanksgiving day and then use the rest to make some Stuffing Muffins. These freeze exceptionally well. Since I also freeze some cooked turkey, we are all set to enjoy some quick turkey dinners all winter long.

You might also want to save a cup or so of dressing to add to your gravy. It helps gravy to thicken while adding additional flavor. Just be sure to let it simmer until it is dissolved.

Serves 18
Ingredients:
10 ounces refrigerated biscuits, baked according to package directions,
8 1⁄2 ounces Jiffy cornbread mix, baked according to package directions,
1 egg, for cornbread mix,
1⁄3 cup milk, for cornbread mix,
1⁄2 cup butter,
1 onion, minced in food processor,
3-5 stalks celery, chopped fine in food processor,
1/2-1 teaspoon salt,
12 ounces breakfast sausage links, raw (slit casings and remove meat, discard casings),
1 egg,
1.5-2 tablespoons poultry seasoning,
1⁄4 cup dried parsley flakes,
12 ounces herb-seasoned or country-style CUBED stuffing,
4 -6 cups chicken broth,

Instructions:

The day before:
1. Bake cornbread and biscuits using the instructions on the label.
2. Cool and roughly chop biscuits into large cubes.
3. Let biscuits and cornbread sit out uncovered overnight to dry (or put in cooled oven).
The next day:
1. Preheat the oven to 350.
2. Melt butter in a pan over medium heat.
3. Add onions, celery, and salt.
4. Saute, stirring occasionally, for about 10 minutes until soft.
5. Scramble egg in a very large mixing bowl.
6. Add raw sausage with the casings removed, poultry seasoning, and parsley. Mix well.
7. Add cubed stuffing and mix well.
8. Lightly toss with chopped biscuits and cornbread.
9. Add broth and mix again. Avoid over mixing, but incorporate most of broth for a heavier dressing, less for a slightly fluffier dressing.
10. Place in a large baking dish and bake uncovered for about 45 minutes-1 hour at 350. The top should be light brown. Alternatively, portion some or all of the dressing into a muffin tin lined with cupcake liners. Bake for about 30 minutes. If you put half of the dressing in a muffin tin and the other half in a regular baking dish, the dressing in a baking dish will take about 30-40 minutes to bake.

Due to raw egg and pork, do not stuff a turkey with this recipe.

Biscuits and Cornbread Thanksgiving Dressing

  • Servings: 18-24
  • Difficulty: easy
  • Print

10 ounces refrigerated biscuits, baked according to package directions
8 1⁄2 ounces Jiffy cornbread mix, baked according to package directions
1 egg, for cornbread mix
1⁄3 cup milk, for cornbread mix

1⁄2 cup butter
1 onion, minced in food processor
3-5 stalks celery, chopped fine in food processor
1/2-1 teaspoon salt
12 ounces breakfast sausage links, raw (slit casings and remove meat, discard casings)
1 egg
1.5-2 tablespoons poultry seasoning
1⁄4 cup dried parsley flakes
12 ounces herb-seasoned or country-style CUBED stuffing
4 -6 cups chicken broth

The day before:
1. Bake cornbread and biscuits using the instructions on the label.
2. Cool and roughly chop biscuits into large cubes.
3. Let biscuits and cornbread sit out uncovered overnight to dry (or put in cooled oven).

The next day:
1. Preheat the oven to 350.
2. Melt butter in a pan over medium heat.
3. Add onions, celery, and salt.
4. Saute, stirring occasionally, for about 10 minutes until soft.
5. Scramble egg in a very large mixing bowl.
6. Add raw sausage with the casings removed, poultry seasoning, and parsley. Mix well.
7. Add cubed stuffing and mix well.
8. Lightly toss with chopped biscuits and cornbread.
9. Add broth and mix again. Avoid over mixing, but incorporate most of broth for a heavier dressing, less for a slightly fluffier dressing.
10. Place in a large baking dish and bake uncovered for about 45 minutes-1 hour at 350. The top should be light brown. Alternatively, portion some or all of the dressing into a muffin tin lined with cupcake liners. Bake for about 30 minutes. If you put half of the dressing in a muffin tin and the other half in a regular baking dish, the dressing in a baking dish will take about 30-40 minutes to bake.

Due to raw egg and pork, do not stuff a turkey with this recipe.

littletudorontheprairie.com

I hope that you enjoy this dressing, at Thanksgiving or anytime of the year.

Happy Cooking!

Some posts on this site include affiliate links. If you click on a link and make a purchase, we may earn a small commission at no extra cost to you. Please know that the opinions expressed are entirely our own.
Advertisement

Creating a Decorative English Fireplace

Create a Decorative English Fireplace
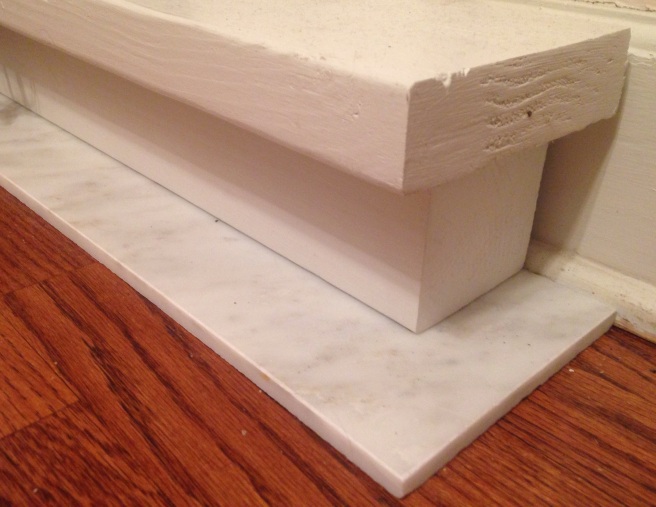
Living in an old Tudor, I have a special affinity for English decorative elements and I cannot think of anything more English than a cast iron Victorian fireplace in a bedroom.  Unfortunately, these are not easily found in the United States.  The ones I did find cost around $1,000, definitely not in my budget!  Fortunately, I was able to assemble a similar faux fireplace at a greatly reduced cost.  Although we cannot heat the bedroom with this fireplace, it does add decorative warmth and ambiance to our space.

I started by stalking Ebay until I found an antique cast iron fireplace surround for just under $150, this was by far the greatest expense.  I could have purchased one even less expensively if I hadn’t had my heart set on an arched fireplace.  Once I had the surround, I could determine the measurements of the rest of my materials.  I was working with a very narrow space, be sure to adjust all measurements to work with your available space.

Supplies

Cast iron fireplace surround

Picture wire strong enough to hang the surround

Tin ceiling tile or another material to hang behind the surround

Thin lumber cut to the width of the surround

2” thick lumber cut to the width of the surround. to serve as the mantel

2” thick lumber cut larger than the bottom of the surround. to serve as the hearth

4 x 4” post for beneath the hearth

12 x 36” marble tile to sit on the floor

2 thick corbels

1 piece decorative moulding

Glue

Screws

Spray paint

Paint for wood

Sandpaper

Supplies for English bedroom fireplace

Steps

  1. Cut all lumber to size
  2. Glue the moulding to the thin lumber backing.  close up of ornament
  3. Sand, wipe away dust, and paint all wooden materials.
  4. Spray paint the iron surround.
  5. Glue the 2″ hearth on the 4 x 4 lumber.
  6. Attach the tin ceiling tile or other backing to the wall with screws.
  7. Place the marble tile, 4 x 4 lumber and 2″ hearth in the desired position.Hearth of a marble tile, a 4 x 4 post and 2 inch thick lumber
  8. Hang the surround so that it will just rest on the hearth materials.
  9. Screw the thin lumber above the surround, hiding the screws behind the corbels
  10. Hang the corbels on the thin lumber backingclose up of mantel
  11. Glue the 2″ mantel on the corbels, making sure the mantel is pushed back against the wallside view of mantel
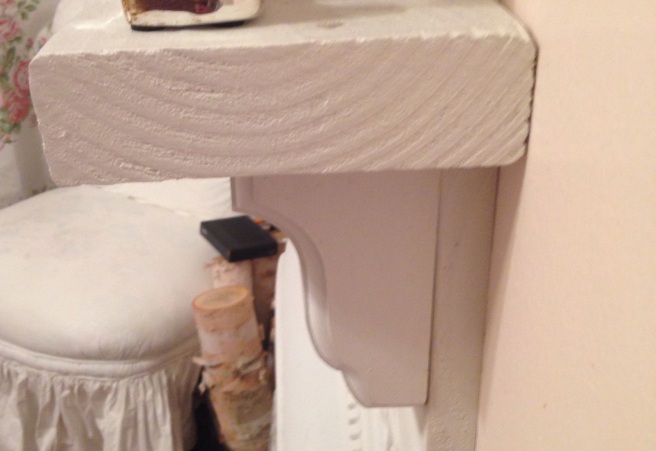
Once your fireplace has been assembled, you can decorate the inside with logs, a fireplace screen, Christmas lights, or candles.  The mantle can be decorated with a vase, clock, candles, books, lamps, pictures, or sculptures.

Happy Decorating!

Some posts on this site include affiliate links. If you click on a link and make a purchase, we may earn a small commission at no extra cost to you. Please know that the opinions expressed are entirely our own.

Freezing Aromatic Flavor Cubes for Asian Stir Fry Suppers

Freezing Aromatic Flavor Cubes for Asian Stir Fry Suppers

Do you love stir fry, but find the prep work tedious?  I felt the same way until I learned some easy short cuts that not only cut back on my prep time, but also meant less clean up time.  One of those short-cuts involved the mixture of garlic, ginger, scallions, and red pepper flakes that add complex flavors to my stir fries.  No matter what meat or vegetables I cook in my stir fry, I always make a little well in the center and quickly fry some aromatics in it before adding a sauce.  Unfortunately, it takes a long time to mince the aromatics small enough that we don’t end up biting into a big, unappetizing hunk of garlic or ginger. I could use the food processor, but I don’t want to get it dirty for such a small job.  I also don’t want to have to buy ginger every time we have a stir fry and ginger doesn’t  really last all that long.  The solution that works for us is to prepare enough aromatics for several stir fry dinners at once and then freeze them in ice cube trays.

Asian Aromatic Flavor Cubes

Ingredients

4 heads peeled garlic (about 8 oz once peeled or 1 cup minced)

2 oz peeled ginger (about 1/4 cup minced)

Whites of 16-20 scallions

1 TB red pepper flakes (optional, adjust according to heat preferences)

¼ cup sesame oil

Unless you love chopping food into tiny bits, use a food processor to mince the garlic, ginger, scallions, and red pepper flakes.  I try to process until it is just short of a puree. Asian aromatics after mincing

Spoon the mixture into an ice cube tray in 1 TB portions, making about 18 portions.  Press the aromatics in tight and then spread the sesame oil over the top where it can soak in and fill in any holes before freezing.

When you are ready to make a stir fry, get an aromatic flavor cube out as soon as you start cooking.  This will allow it to thaw a little before mixing into your stir fry.  I set the cube near the pan to help the thawing process.  This mixture can also be used to flavor a marinade for grilling meat.

Simplify stir fry with aromatic flavor cubes.  Happy Cooking!

Some posts on this site include affiliate links. If you click on a link and make a purchase, we may earn a small commission at no extra cost to you. Please know that the opinions expressed are entirely our own.

Create a Useful Dining Centerpiece

1[1]

I have a minor obsession with centerpieces.  Over the years, I have tried one thing after another, never satisfied with my efforts.  I guess it is important to me because centerpieces are usually the focal point of any dining room, so I want ours to make a statement.  Unfortunately, sometimes that statement was, “I am too tall to have a conversation over” or “I am really easy to knock over”.  More than once it turned out to be, “I looked good on Pinterest, but I don’t work in real life”.  Even when a centerpiece was attractive, the look was always marred by the practical items that needed to stay on the table for meals.  Finally, it occurred to me–why not make those functional items into one centerpiece?  Doing so had the added benefit of allowing us to stop moving items to and from the table every day.

There are many possibilities for a container in which to place your centerpiece items.  The one that I pictured here is technically a condiment server, that is no longer available, but I have also used this copper plant tray.  When I was looking for just the right item, I looked at condiment servers, trough planters, utensil caddies and, wooden toolboxes.  In addition to Amazon, Etsy and Ebay have some great options.

The item that I eventually bought is 18″ long, which allows space for me to place food on either end when we eat.  If you have a long table, you might go as long as 24″ or possibly longer.  As you can see, mine is divided into sections, but I am not sure that I would choose a sectioned centerpiece again unless the sections were at least 7-8 inches wide.  This would have allowed the trivets to fit in without angling them.  Also pay attention to the height of the items that you want to put in there.  These sections are 4″ deep and my salt and pepper shakers are just barely tall enough to easily access.  If you use a shallower container, you might use jelly jars or other containers to hold items upright.

The items to put in your centerpiece depend entirely on what you typically need at the table.  For us, that meant napkins, trivets, salt & pepper shakers, silverware, and the pink-striped tea towels that we use as place mats.  You could also consider other condiments than do not require refrigeration.  Another possibility would be placing all of your serving spoons in your centerpiece.

I hope that you are inspired to design your own useful centerpiece.  Happy Decorating!

Some posts on this site include affiliate links. If you click on a link and make a purchase, we may earn a small commission at no extra cost to you. Please know that the opinions expressed are entirely our own.

10 Container Flowers that Bloom All Summer

10 Annual Container Flowers that Bloom All Summer.png

When I first started gardening, I chose flowers ENTIRELY based on looks…I was so superficial back then.  I scoffed at those who bought petunias.  They were so boring..  I was only going to plant the less common flowers.  No impatiens for this girl!  So, I planted those unusual flowers.  Some of them made it and some of them didn’t.  At first I thought it was due to my inconsistent watering. After I improved my watering by using drip irrigation (see here), I realized that it hadn’t been just my poor caretaking, it was also my flower choices.  Turns out, the flowers that  I so readily scoffed at were probably so common because they were much easier to grow than the flowers I was choosing.

Urn with petunias, impatiens, euphorbia, dusty miller, dichondra, spike
Impatiens, Bacopa, Euphorbia, Petunias, Dusty Miller, Dichondra

Cool-Season Annuals.  I realized that I was wasting a lot of money buying plants that didn’t have much of a chance where I live, so I started making a list of the flowers that I bought in the spring and then taking an inventory in August to see what was still blooming.  If a plant didn’t make it to August for two consecutive years, it was downgraded to a “maybe” plant.  I didn’t want to completely stop buying all of the flowers that petered out in the heat, because that would mean giving up some of my favorites. Instead, I bought very limited quantities of flowers such as alyssum, pansies, and lobelia and planned for their demise.  In other words, during the spring, I would enjoy these short bloomers next to longer-blooming flowers.  Once they died or flowering slowed considerably, I would pull them out to make additional room for the flowers that had proven to be longer blooming.  Another option is to wait for cooler weather in the fall when these flowers may bloom again.

Heat Tolerant, but Require Deadheading.  I also noted that, for some flowers, it wasn’t about the heat.  For instance, geraniums and marigolds do well in the heat, but they require deadheading to keep blooming.  I began to also limit these to small quantities, no more than I was willing to deadhead.  Similarly, Cosmos and Zinnias do well in the heat, but require deadheading to keep blooming.  For these, the solution was a cutting garden, the frequent cutting of flower bouquets means an abundance of these flowers for most of the summer.

My Top Ten.  The ten cottage annuals chosen for this list do well in containers, even when temperatures top 100 degrees.  They do not require deadheading, although a few will benefit from being cut back by half midway through the summer.  I usually do this shortly before we go on vacation.  We return to find the flowers blooming even better than before they were cut back.

Torenia and Double Impatiens in a Brick planterTorenia.  It is a mystery to me why torenia, also known as wishbone flower, is not more widely grown.  It is incredibly adaptable, doing well in both sun and shade.  Heat doesn’t seem to affect it one little bit, it just keeps on trucking.  I now only buy the Summer Wave series from Proven Winners.  Any other cultivars have been a disappointment.  The above photo was taken of two Violet Torenia plants and one double impatiens, midway through the summer; they were even larger by fall.

euphorbia, impatiens, petunia, spikeEuphorbia.  These tiny white flowers that resemble baby’s breath are a versatile filler in both sun and shade. Don’t over water, it is drought tolerant.  Euphorbia is exceptionally easy to take cuttings from and some also overwinter this plant indoors.  “Diamond Frost” is a favorite.


petunias with bunnyPetunias.  Petunias are known as a flower for full sun, but in my area, they seem to do well even in partial shade.  Although deadheading may increase the number of blooms, I find it sufficient to cut them back about halfway once in the middle of summer. Petunias seem adaptable to a variety of watering conditions.  They come in a rainbow of colors, but I am partial to the pink and purple varieties.  If I could afford to do so, I would love to buy dozens of the expensive cultivars, but I am always satisfied with the less expensive plants that I buy in six packs.


Angelonia.  Also known as Summer Snapdragon, Angelonia requires full sun and is fairly drought tolerant.  Most varieties grow over one foot tall.  It is sometimes helpful to cut these back once during the middle of summer.  The Serena series is grown from seed and easiest to find, but I prefer Proven Winner’s Wedgewood Blue when I can find it.


bacopa, euphorbia, petunia in urn croppedBacopa.  The little white flowers of this delightful plant continue to bloom in part shade to full sun, as long as they are not allowed to dry out.  If blooming slows, cut back once about halfway during the summer.  Bacopa drapes beautifully over the side of a planter.  In addition to this white, it also comes in pink and purple.


Calibrachoa.  Once you have grown this prolific bloomer, it is easy to see how it earned it’s nickname, Million Bells.  Single Calis looks like mini-petunias, while the double Calis look like mini-roses.  It comes in several colors, but I am partial to this Double Pink Calibrachoa.  As pictured here, Calibrachoa fills in the planter, as well as spilling over the edge.  Calibrachoa needs full sun and be careful not to over water.


Impatiens.  Of all the flowers I buy, I depend most on lovely impatiens, also known as, “Busy Lizzies”.  There are now some more expensive varieties that do well in sun, but I love the inexpensive varieties that I can afford to buy by the flat to brighten up the shady areas of my garden.  In recent years, I was surprised to realize that my impatiens can also do well in sun.  The above variety is called Blue Pearl, although they are pink.  Impatiens require regular watering.


Salvia.  Although these Victoria Blue Salvia were purchased as annuals, many plants often return after a mild winter…or perhaps they just self sow.  Salvia are known for their drought tolerance.  Be sure to check the projected height of any salvia before purchase.  Some grow too tall for smaller containers.  Salvia are best in full sun, but also do well in partial shade.


Verbena.  While I love the many shades of verbena, most that I have tried required some cutting back for continued blooming.  Not so with these little Imagination Verbena.  Verbena do well in partial shade to full sun.  Although they tolerate some dry conditions, they seem to flower best when kept continuously moist.  These verbena are especially useful for adding height to containers.


VincaVinca. As a beginning gardener, I could not tell the different between impatiens and Vinca to save my life.  Even today, I pay more attention to the foliage, than the flower.  Vinca, also known as periwinkle, does well in full sun and is fairly drought tolerant.  For me, the plants stay relatively small, but still provide a nice pop of color.


Honorable Mention:  The following flowers also do well in heat and do not require deadheading:  Pentas, Lantana, Scaevola, Begonia, Moss Rose.

Spend less time deadheading and more time relaxing in your garden.

Happy Gardening!

Make a Fireplace Screen from a Stained Glass Window

Make a Fireplace Screen from a Stained Glass Window.  Photos and a printable with materials and instructions are included.I didn’t particularly like the gas fireplace insert that came with our older home, but a new one was not in the budget.  My next thought was to buy a fireplace screen to cover it up, but they were all expensive, unattractive, or you could see through them, which rather defeated the purpose.  When I fell in love with an old stained glass window in an antique store, I knew that I had to have it, but could it serve as a fireplace screen if I attached some shelf brackets?  I decided to buy it and figure out the “how to” later.

After some thought, the answer came after I bought the shelf brackets and realized that the metal part inside could be unscrewed and turned upside down, such that the large part where the screw was inserted was at the bottom and the smaller part was at the top.  Once the screw was attached to the stained glass window, the window sat on the brackets, even without wood glue.

Shelf BracketStill, for added strength and stability, I used wood glue and secured the bond with C-clamps to dry overnight.  Incidentally, I chose these particular shelf brackets because the open design would allow me to easily attach the C-clamps.

unpainted stained glass window with brackets

Once the brackets were attached, I taped off the glass and painted all of the wood black.

It should be noted that a fireplace screen such as this should not be placed in front of an open flame.  Our fireplace has a gas insert, so all flames are behind glass.  A fire lit up the stained glass, but we just don’t light our fireplace all that often.  I eventually tried Christmas lights hung on a couple of nails behind the glass.  Much better!

The warm lights give the room a nice amber glow at night.

Stained Glass Fireplace Screen with Christmas lights

Please click here for a printable list of tools, materials, and instructions.

Happy Decorating!

Some posts on this site include affiliate links. If you click on a link and make a purchase, we may earn a small commission at no extra cost to you. This commission allows us to avoid banner ads and popups. Please know that the opinions expressed are entirely our own.
EPSON MFP image
Make a Fireplace Screen from a Stained Glass Window
Some posts on this site include affiliate links. If you click on a link and make a purchase, we may earn a small commission at no extra cost to you. Please know that the opinions expressed are entirely our own.

6 Creative Uses for Drip Irrigation

6 Creative Uses for Drip IrrigationI love drip irrigation!  If are interested in using drip irrigation and would like to learn how to do so, please read The Beginners Guide to Using Drip Irrigation in Your Containers.  If you would like to consider some different uses for drip irrigation, please keep reading…

Living Wreath.  Have you ever seen a planter like this and thought it would be too difficult to use?  I had purchased this wire living wreath form before I started using drip irrigation, but I quickly learned there was no  easy way to keep it hydrated.  It was awkward to water with a hose and plunging it into a tub of water frequently enough to keep the impatiens hydrated just wasn’t practical.  The solution was a loop of tubing going around the inside of the wreath with 4 emitters attached.  Another alternative would be using a small length of drilled soaker tubing inside the form.

impatiens wreath using drip irrigation
Living wreath hanging on a ladder with peat moss sheets and pink impatiens.

Birdbath.  Do the birds in your garden have to miss their baths during dry weather?  We have many birds in our backyard and they just love this little birdbath.  It only took a few seconds to fill when I was hand watering, but once I didn’t need to hand water anymore, I didn’t always feel like making a trip out to fill it on a hot day.  I could have hung an emitter over the side, but that would have ruined the look of this birdbath.  The solution was hiding a drip emitter over a branch in the dogwood tree overhead.  It drips into the birdbath while my flower containers are receiving water from their drip emitters.bunny in birdbath with drip emitter in tree overheadDifficult-to-Reach Containers.  At one point, I had my many containers around the fence line of our property receiving water, but I still had to go out daily to water this urn in the middle of our garden.  When we went on vacation, I would run a temporary line of tubing to it, but that was not a permanent solution because the tubing would show and/or accidentally be mowed.  The solution was using a slim piece of PVC pipe with the drip tubing inside of it and burying it between the nearest flower bed and this urn.  It took less than an hour to dig a shallow trench and bury a piece of PVC with the drip irrigation inside.  In just a short time, the grass had filled in and the tubing was no longer visible.  It’s been quite a few years and this solution is still going strong!

urn planter in middle of yard

PVC and drip tubing in bed and about to go underground
Drip tubing inside a slim PVC pipe is about to travel underground to the planter in the middle of the yard.

Container Water Garden.  Have you ever made a container water garden?  They are so easy and fun!  For the first one that I made, I just hung an emitter inside it to keep the water garden full.  You could not easily see the tubing behind the plants.  I later learned to bring the tubing up through the planting hole before plugging it with plumber’s underwater epoxy putty.

butterfly
Water garden with water celery, sweet flag, and copper butterfly dripper fountain.

Fairy Gardens.  Do you have a fairy garden?  I love these tiny little pots that go in a fairy garden, but how could I possibly keep something so small hydrated during our long, hot summers?  I learned that I could insert the tip of an emitter into the bottom of each little container.  This one is a little tricky because you have to bury the emitter with it facing directly up and then fiddle with it a little until it stands up straight.  I think it’s well worth it!  For more about creating your own fairy garden, see Magical Lights in the Fairy Garden.

drip irrigation in fairy garden

Butterfly Puddlers.  Did you know that butterflies benefit from the nutrition that they find in mud puddles?  For more on that, read this.  My latest project is hanging a drip emitter over some sandy, salted mud to make a butterfly mud puddler.  The emitter could be hung in a tree or on a Shepard’s hook overhead.  You could even just identify a hanging flower container that starts dripping pretty quickly when watered and move away some mulch underneath to make your butterfly mud puddler there.  We will see if this works.  It isn’t terribly attractive, is it?  Hopefully the butterflies won’t mind!

butterfly mud puddler

I hope that you found a fun project to use in your garden!  Happy Gardening!

Some posts on this site include affiliate links. If you click on a link and make a purchase, we may earn a small commission at no extra cost to you. Please know that the opinions expressed are entirely our own.

The Beginner’s Guide to Using Drip Irrigation in your Container Garden. It’s EASY!

The Beginner's Guide to Using Drip Irrigation in Container Gardens. It's Easy!

For years, I avoided using drip irrigation because it seemed entirely too complicated and expensive.  My garden suffered…and died, died, died. Year after year, I would attempt to go on vacation in July by trying different systems such as cotton wicks plunged into 5-gallon buckets of water or flooding plants before leaving by using all types of stakes that attached to 2-liter bottles. I finally caved and decided that I had to either try drip irrigation or stop buying plants altogether. Within  minutes of receiving my first kit, I realized that I should have started much sooner. Drip irrigation is SO EASY and it saves oodles of time and aggravation!  While there are some reasonable costs involved, there are also many savings. For starters, plants live instead of dying!  That means fewer plants to purchase.  Furthermore, less water is needed since hydration is provided directly to the roots without wetting the foliage.

Where to buy.  One option is to start with a kit like the  Raindrip Automatic Container and Hanging Baskets Kit which has much of what you need to see if drip irritation is something you would like to use.

If you don’t want a kit or you are already pretty committed to an expansive drip irrigation system, here are the supplies that I use.  I have also seen drip irrigation supplies at local retailers such as Orscheln’s, Menard’s, Home Depot, and Lowe’s.

Keep in mind, that unless you want to create a large-scale system, it might save money to buy some of these in groupings.  For instance this 1/4″ barbed assortment includes tees, couplings, and goof plugs in a smaller quantity and at at a good price.

Specifications.  If your hose has a low flow rate, be sure to attend to this before moving forward.  When I started, I initially bought a kit with similar fittings described in this post.  It promised to water 60 emitters at a max flow rate of only 30 gallons per hour.  If your spigot would fill a five-gallon bucket at least six times in an hour, you should be in good shape.  If you want more than 60 emitters on your line, you could set up two different lines.  The Orbit would allow you to water each line at a different time.  It should also be noted that, to have adequate water pressure, you cannot have a continuous line of tubing longer than 50 feet.  Finally, some larger pots might require 2 or more emitters.

Connect to the faucet spigot.  You will start by hooking up the following items to the faucet spigot in this order:

  1. backflow preventer
  2. inline filter
  3. pressure regulator
  4. barbed adapter

drip irrigation from spigot labeledBarbed adapter connects to the tubing which carries the water out to your plants.

Add an emitter to each container.  You then just cut a piece of that tubing near each plant, insert a Tee, and then attach another piece of tubing which is connected to an emitter that drips into your pot.  SO EASY!

5 steps drip irrigation

Which timer should you buy?  Some kits include a timer, but after trying several different timers, I have found the Orbit Programmable Timers to be the most reliable and easiest to use. You can buy them with one, two, or three outlets. I started with the single-outlet timer which watered a lot of containers, but I eventually expanded so much that I needed two outlets to accommodate two different watering zones.  More recently, I added a third outlet to accommodate a few containers that require very little water.  With that said, I think it likely that a single outlet would meet the needs of most gardeners.

Setting the Timer.  You will turn the dial counterclockwise to set the current time, a start time, duration, and frequency for each outlet.  The plus and minus buttons are used to make these desired adjustments.    If you buy a two- or three-outlet timer, the arrows are used to choose which outlet you are programming.  All timers also have a manual option that can be used to turn on the water without waiting for the desired time.

orbit timer connected to drip irrigation

How much water?  Depending on the outdoor temperature, I set the timer to water 1-2 times per day for 10-20 minutes per cycle.  If we receive a fair bit of rain, I simply push the rain-delay button on the timer and watering is delayed for 24 hours.

Fall Maintenance.  Every fall, I cut off the tubing from the barbed adapter and bring everything that connects the spigot to the tubing inside, all in one piece.  This includes the timer.

Spring Maintenance.  In the spring, I insert fresh batteries into the timer and then switch out the old washer for a new one before hooking the timer to the spigot.  You may also need a new barbed adapter to attach the tubing.  Then, I turn everything on and walk the lines to make sure each emitter is still working.  Invariably, a few emitters will need replacing or a tube needs reattaching.

Using drip irrigation has increased my gardening success and enjoyment immeasurably.  To read about some fun and creative ways to use drip irrigation, please see 6 Creative Uses for Drip Irrigation.

Happy Gardening!

Some posts on this site include affiliate links. If you click on a link and make a purchase, we may earn a small commission at no extra cost to you. Please know that the opinions expressed are entirely our own.

Creating Travel Scrapbooks on the Road

I have boxes and boxes of vacation photos and memorabilia that I always plan to put in a scrapbook someday when I have the time.  On trips in more recent years, I have promised myself that I would translate my digital photos into a beautiful Shutterfly album as soon as I returned home.  It really shouldn’t be that hard to preserve our memories in these ways but somehow life always gets in the way once we return home.   That is why, when I saw a Pinterest photo of a school box with enough supplies to create a scrapbook while still on the road, I knew that I had to try it!  I immediately created my own portable scrapbook studio in a small pencil box.  Unfortunately, my motto in life sometimes seems to be

Anything worth doing is worth overdoing.  

That is why, before long, I had instead purchased a larger, deeper box with adjustable compartments (14 x 9.1 x 2.8 inches) and my kit looked like this:

Portable Scrapbook Supply Organizer Kit for Road Trips and other Travel

Supplies.  Does one really need all of these supplies to make a travel scrapbook on the road?  Not even close!  All that is really needed is a book or binder with paper and a pencil box with scissors, adhesive, and a pen or marker.  Still, I had a lot of fun having all these extras. Here is a list of what I took in my portable scrapbooking studio.

EPSON MFP imageWhere to buy.  Most of the items on this list can be found at hobby stores such as Hobby Lobby, JoAnn’s, and Michael’s.  However, I also found some items at Amazon, Wal-mart, or Etsy.  While searching for travel journals on Pinterest, I saw the cutest “You are Here” stamp.  I looked absolutely everywhere for a similar one, but they were completely sold out.  I was thrilled that the nice folks at Simon’s Stamps were able to custom make a similar one for me for a reasonable price.

Binder.  After looking at some different Smash Books and Scrapbooks, I ultimately decided to go with this customizable 3-ring binder that I ordered on zazzle.com.  I then used a three-hole punch to punch holes in some Kraft paper cardstock to use as the pages.

binder.JPG

I actually found that I was able to be much less of a perfectionist creating this book than I am creating more formal scrapbook or Shutterfly albums.  I didn’t work on the book everyday, I would just catch up whenever I felt like it, sometimes that was in the hotel if my husband  was watching something that did not interest me.  Mostly, though, I worked on the road which was a nice distraction since we were sometimes on the road for several hours per day.

first page

My biggest splurge was definitely an Instax printer which was a birthday gift from my husband.  I chose it over the Instax camera because it is small. Plus, when you take a photo with the Instax camera, that is the photo that you are going to get, good or bad.  The printer gives you the option to choose a photo from your iPhone and even edit it before printing, if you want.  I had an instant camera in the 1980s, I wanted every shot to be good and choosing the printer helped me to do that.

instax
Instax printer, cord and film in a pencil box

You need to have a Wi-Fi connection, so I always printed my photos in the hotel at night.  It is actually quite simple to use.  You will need to download the Instax Share app onto your phone and insert the batteries and film into the printer.  Here is how to print a photo from your phone:

  1.  Crop/edit the photo that you want to print and save it on your phone before opening the Instax app.
  2. Turn on your Instax printer.
  3.  On your phone, choose Settings->Wi-Fi and choose Instax when it comes up under “Choose a Network”.  You will need to repeat this anytime the printer has turned off, even briefly.
  4. Open the Instax Share app on your iPhone.
  5. Select, “Choose from Photos”
  6. Select the photo that you want to print
  7. If preferred, choose edit to rotate the photo, edit text or apply filters (optional)
  8. Select Connect and Print.

The phone will tell you how much film you have left.  The power shuts off pretty quickly after printing.  The quality is fairly good, but not perfect, it definitely has that old retro vibe, as you can see in the upper right of this layout.

Maryland

The washi tape came in handy for a variety of purposes, but I especially loved using it to make pockets with a half piece of cardstock.

Jamestowne

My husband was not happy about my decision to buy a selfie-stick, but we usually come back from vacations with almost no photos of the two of us together.  It’s important to me to have photos like that because the memories are the best part of a vacation!

Cape Cod

I brought along a manila envelope and, as we visited different places, I would put brochures, maps, and  other scraps into it until I could cut them up and glue them onto the pages.

blue ridge mountains

I was going for an old-fashioned, retro vibe in this book, so I found a lot of old blank postcard printables on-line before we left and printed them on cardstock to use as journaling cards.  To go with them, I searched google images for retro postcards of the places we would be visiting and then printed those out to use on my pages.  I also like the look of these a lot more than the overpriced postcards that we found in shops along the way.

I probably should have spent more time journaling, but these postcards that I wrote out were more journaling than I have ever taken the time to do on a vacation, so this was an accomplishment for me! If you are reading these journals, you might want to know that I am a genealogy nut and we were stopping at some of our ancestors graves along the way.  Or, as my husband joked, visiting my “dead kin”.

Connecticut

I also had fun using my “You are here” stamp, old school embossing label maker, and the fun embellishments that I brought along to enhance each page.Lexington

I hope that you found some ideas to help you preserve your memories, even while you are in the midst of making them!  Happy travels!

Some posts on this site include affiliate links. If you click on a link and make a purchase, we may earn a small commission at no extra cost to you. Please know that the opinions expressed are entirely our own.

How to Prepare for (Almost) Anything on Your Road Trip

My husband and I spent three glorious weeks driving up the coast from Virginia to Maine last summer.  Before we left, I considered potential problems that might arise and how we could avoid or solve those problems.  Having been on some shorter road trips in the past, I knew how inconvenient it can be when you need something on the road and must track down a place to buy it.  Since we would be changing hotels almost every night, I also didn’t want to be dragging a lot of luggage into our hotel every night.  For that reason, I decided to bring as many useful items as would fit in a small space and could stay in our SUV.  I bought a set of plastic school pencil boxes for $1/each at a dollar store and the 3 plastic drawer cart made by Sterilite for about $10 at Wal-Mart.  The dimensions of this cart are 14.50 x 12.63 x 24.00 inches, so all of the items listed below fit into a little over two square feet. We used it without the wheels, it fit perfectly in the back of our SUV (without blocking our view), and there it stayed for the duration of our trip.  Once we returned home, I put it in our storage room and it is ready to go on our next adventure.

I found that I could fit up to five pencil boxes in each drawer and each pencil box held a lot!

uploaded oct 2015 154

As you can see, I used one pencil box just for sunscreen (body and face) and bug repellent.  Also, in this drawer were items categorized as Problem Solvers, Laundry, First Aid, and Office.

Problem Solvers.  My goal was to include items that could be useful in a variety of circumstances that might arise.  Fortunately, we only needed about half of these items, but I was glad to have them all along, just in case.  We could have fit even more into this pencil case, had we wanted to.

Problem Solvers

Laundry.  Not wanting to pack three weeks worth of clothing, I knew that we would need to do laundry at least twice, but I didn’t want to cart around a bunch of liquid detergent, fabric softener, and static guard.  Luckily, I already had these 3-in-1  Purex laundry sheets that I had purchased on Amazon a few years earlier when we were needing to do laundry between a conference in Seattle and a cruise to Alaska.  We only use these for travel since they are a little pricey, a little over a dollar a load, but I think it is more than worth it to not mess with liquid detergent and the rest while traveling.  I really like the Purex, but if you cannot find those, you might try WashEZE.  I also saved quarters in an empty mini-M&M package.  It was the perfect size!  We used everything on this list at some point during our trip.

Laundry with list

Don’t accidents always happen while on vacation?  That is why I put more thought into our first-aid kit than anything else.  The one thing I almost left behind was this compression bandage because it took some doing to get everything on this list to fit into that little pencil box and I wasn’t sure that big compression bandage deserved so much real estate.  Turns out, that was the one item I needed most.  On our VERY FIRST night on the road, I tripped and broke my elbow in downtown Nashville. What are the odds?  We didn’t know it was a break until we returned home.  I initially thought it was just a sprain and so did the doctor at the Urgent Care that we went to the day after I was hurt.  He was impressed that I had immediately done RICE:  Rest, Ice, Compression, Elevate.  This was possible because the kit was in our car and not in our hotel room, so we were able to easily access the compression bandage, advil, and a Ziploc baggie, which the nice bartender filled with ice for me. I was able to fulfill my dream of listening to live music at the Station Inn for a little while before we headed back to the hotel where I took advantage of another item in my first-aid kit…a prescription-strength pain killer from my recent surgery.

I used old medicine bottles for some supplies, one for cotton and Q-tips and one for rubber gloves.  I also made a splinter kit out of a little matchbox.  It had a needle and some matches to disinfect the needle.  Come to think of it, that might not be best way to handle splinters, but that’s how we all did it when I was growing  up.

I also put small portions of several medications in tiny Ziploc-style bags and stored them in an old Altoids tin.  I had purchased the bags previously in the jewelry-making department at Hobby Lobby, one of my many abandoned hobbies.  Medications were included that would treat pain, stiff muscles, allergies, diarrhea, gas, nausea, and motion sickness.

I also had a list of our current medications and another paper that had first-aid instructions.  It was from these instructions that I was reminded to do RICE.

First Aid Kit canva

I knew we would want to send some postcards to family and friends during our trip and also that we would be dealing with all the maps, brochures and other paperwork that piles up when you are sightseeing.  I put some of these smaller items in a plastic soap container that we had never used before.  The mini tape measure came in handy when we stopped to look at antiques a couple of times.  The highlighter helped us mark places where we wanted to visit and the permanent marker was used several times to label items.The office

Everything listed so far fit in only ONE drawer in the Sterlite 3-drawer cart.  Can you believe it?  Luckily, I don’t have much to say about the remaining two drawers, so try to hang in there with me for a few more minutes.

One of the other drawers was my mini-kitchen on the road.  We wanted to spend our money on experiences on the road and that meant having some picnics and avoiding spending a lot on beverages.  We brought some reusable Copco coffee mugs and Copco tumblers.  Having a little bottle of dish soap meant that I could wash these out each night at the hotel.  Every morning, we would fill our tumblers and a gallon-sized Ziploc bag with ice at the hotel.  We also saved by filling our mugs with coffee each morning at the free breakfast.  We kept our tumblers full at water fountains and from our stash of beverages that we brought along and replenished along the way.  It was fun to pick up regional beverages at local grocery stores for a reasonable price.

One of my favorite finds was this nifty little Japanese knife with wood sheath which only cost about $7.  This was handy in preparing a wide range of items, but especially cutting up fruits, vegetables, and cheese.  Having a Swiss Army Knife also came in handy, especially when we decided that we needed wine!  I brought our reusable string grocery bags for more than groceries because they hold a lot and take up very little space.

Kitchen with list

The final drawer held cleaning supplies for a variety of situations, but especially for the many bathrooms used along the way!  Speaking of public bathrooms, have you heard of the Charmin Sit-or-Squat app?  It was a lifesaver and we found  a lot of humor in labeling bathrooms a Sit or a Squat based on their cleanliness.

Cleaning 2

In addition to the pencil box, the cleaning drawer included a thin bath towel, paper towels, and wet wipes.

Cleaning

Having this cart in the back of our SUV was a huge help because we didn’t need to unload it every night and we could easily access needed items on a daily basis.  I hope you find this information useful.  Happy traveling on your adventure!

Please click below for a free printable list of all items mentioned above, plus everything else that we fit into our Ford Escape:

Packing Car Preparing Extended Road Trip.jpg

Pack and Prepare for almost anything on your extended road trip.Prepare for Road Trip Kitchen Cleaning Household first aid problem solvers laundry office (1)
Some posts on this site include affiliate links. If you click on a link and make a purchase, we may earn a small commission at no extra cost to you. Please know that the opinions expressed are entirely our own.